OpenID Connect (OIDC) Integration
OpenID Connect (OIDC) enables SSO authentication with external Identity Providers.
OpenID Connect (OIDC) integrates with Identity Providers (IdP) external to QuestDB.
It is a convenient way to integrate QuestDB into your enterprise environment. It provides SSO (Single Sign-On) for the Web Console, and token authentication for applications and services that connect to QuestDB.
Microsoft Active Directory and Azure AD, for example, can be turned into an Identity Provider.
Specific installation steps depend on the type of the provider.
Architecture overview
Altogether, the architecture appears as such:
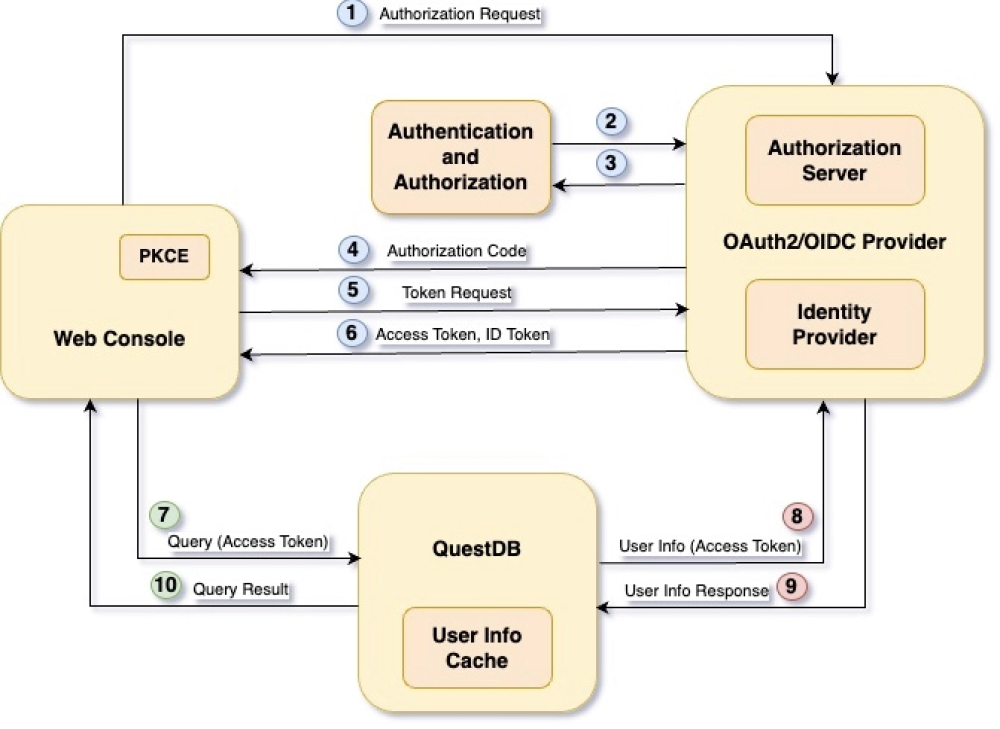
We can break it down into core components.
Web Console
QuestDB's interactive UI. Users must authenticate before accessing the database via the interface.
The Web Console uses PKCE (Proof Key for Code Exchange) to secure the authentication and authorization flow.
In OAuth2/OIDC terms, the Web Console is referred to as the client, and it is assigned an identifier: the Client Id.
Each application which integrates via OIDC should be given a different Client Id.
OIDC Provider
Typically consists of a number of modules.
We are interested in two of them only.
-
The Identity Provider holds user identities and user information, capable of authenticating users, and to issue an ID Token which uniquely identify them.
-
The Authorization Server grants access to resources, such as a database, in the form of access tokens.
The OIDC Provider usually integrates with a number of applications which require different access to a number of resources.
These clients communicate with the OIDC Provider via its endpoints.
It exposes a number of APIs, including the Authorization, Token and User Info endpoints.
QuestDB
The database, in OAuth2/OIDC terms the protected resource or resource server.
Only processes requests which contain a valid access token.
Authentication and Authorization Flow
The OAuth2/OIDC standard defines different ways of obtaining access and ID tokens from the OIDC Provider, referred to as the "flow".
The goal of this flow is to get the user, who is sitting in front of the Web Console, authenticated.
Then, it allows QuestDB to determine the user's permissions based on user information provided by the Identity Providers.
Specifically, the QuestDB Web Console uses the
Authorization Code Flow with PKCE option.
It consists of ten steps...
1. Secret generation
First the Web Console generates a cryptographically strong random secret called the code verifier.
The secret is hashed using the SHA256 algorithm. The result is the code challenge.
After PKCE initialization the Web Console requests an authorization code from the OIDC Provider.
It calls the Authorization endpoint with a few parameters, including the:
- Client Id
- requested scopes (the list of scopes are configurable, default is
openidonly) - code challenge
- algorithm used to generate the code challenge from the code verifier (SHA256)
When the Authorization Server receives the request, it checks if the user has been authenticated already:
-
If the user has a valid session, it can be provided with an authorization code straight away, so we jump to step 4.
-
If the user does not have a valid session yet, it will be redirected to the Identity Provider for authentication.
https://oidc.provider:443/as/authorization.oauth2?client_id=questdb&response_type=code&scope=openid&redirect_uri=https%3A%2F%2Fquestdb.host%3A9000&code_challenge=IwZ-WuypAY3fMtvismbj1MQUe5CzMgrBa87nYcgFoLQ&code_challenge_method=S256
2. Prove identity
Next, the user must prove its identity.
This could be a username with:
- a password,
- an OTP
- facial recognition via a mobile app
- or anything else supported by the Identity Provider.

3. Scope consent
After successful authentication, the user provides consent for the requested scopes.
The list of scopes are configurable.
By default the Web Console requests only the openid scope which is mandatory
for OIDC.
No ID Token is issued without it.
The OIDC provider can be configured to provide the consent automatically, without presenting the user with an additional screen in the browser.

4. Redirection
Consent is granted!
The Authorization Server redirects the user back to the Web Console with the authorization code:
https://questdb.host:9000/?code=1L344XEY5XRka1j4ySNa8bVQSLf71as9uGLEuv_A
5. Credential request
Now, the QuestDB Web Console requests the ID and access tokens from the Token endpoint of the OIDC Provider with the authorization code.
It includes the Client ID and the PKCE code verifier together with the authorization code in the request.
The endpoint then hashes the code verifier using the method specified previously in step 1.
The result must match the code challenge, also provided in step 1.
The matching code challenge proves that the token is requested by the client which requested the authorization code, and it was not stolen:
POST https://oidc.provider:443/as/token.oauth2 HTTP/1.1
Content-Type: application/x-www-form-urlencoded
grant_type=authorization_code&code=1L344XEY5XRka1j4ySNa8bVQSLf71as9uGLEuv_A&client_id=questdb&&redirect_uri=https%3A%2F%2Fquestdb.host%3A9000&code_verifier=uGZh4sQffXLgRna7D-jtEAkuXzp7Lm_okZXBljzP38coAD44kEheIaz7Pdh98KxYtYLZHNiQPCczQYeF
6. Credentials received
If the PKCE check is passed, the Web Console receives the ID and access tokens.
There is a third token in the response too, the refresh token.
The refresh token is used by the Web Console to refresh the access token before it expires.
Without the refresh token mechanism, the user would be forced to re-authenticate when the access token expires.
The validity of the tokens are configurable inside the OIDC Provider.
{
  "access_token": "gslpJtzmmi6RwaPSx0dYGD4tEkom",
  "refresh_token": "FUuAAqMp6LSTKmkUd5uZuodhiE4Kr6M7Eyv.eg83ge",
  "id_token": "eyJhbGciOiJSUzI1NiIsImtpZCI6I...",
  "token_type": "Bearer",
  "expires_in": 300 // In seconds, thus 5 minutes
}
7. Database access
With the tokens, the Web Console can interact with the database.
The access token is in the header of every request sent to QuestDB. With
acl.oidc.groups.encoded.in.token=true, the Web Console sends the ID token
instead, as described in step 8.
Worried about exposing the token? It is rather opaque and does not contain user details.
To carry out permission checks, the database has to know more about the user.
For this, QuestDB has a User Info Cache.
If it finds a valid entry with the access token in the cache, steps 8 and 9 are skipped:
https://questdb.host:9999/exec?query=select%20current_user()
Authorization: Bearer gslpJtzmmi6RwaPSx0dYGD4tEkom
8. Find user information
No user information in the cache, or stale information?
QuestDB uses the access token to request user information from the OIDC Provider's User Info endpoint.
This call also serves as token validation.
If the token is not real or has been expired, the User Info endpoint replies with an error:
https://oidc.provider:443/idp/userinfo.openid
Authorization: Bearer gslpJtzmmi6RwaPSx0dYGD4tEkom
With acl.oidc.groups.encoded.in.token=true, the Web Console sends the ID
token instead of the access token, and QuestDB skips this call. It validates
the ID token itself, as described in Token validation, and
reads the user information from the token's payload.
9. Receive user information
If the access token is valid, QuestDB receives the required user information from the endpoint, then updates its cache.
The cache improves performance, as QuestDB does not have to turn to the OIDC Provider on every single request.
Do note that cache expiry is configurable:
{
  "sub": "externalUser",
  "name": "External User",
  "groups": [
    "CN=TestGroup1,OU=DC Users,DC=ad,DC=quest,DC=dev",
    "CN=TestGroup2,OU=DC Users,DC=ad,DC=quest,DC=dev"
  ]
}
10. Permission check
With the help of the user information, QuestDB can carry out permission checks.
If the permission check is successful, the database will process the request, and then sends the results back:
{
  "query": "select current_user()",
  "columns": [
    {
      "name": "current_user",
      "type": "STRING"
    }
  ],
  "dataset": [["externalUser"]],
  "count": 1,
  "timestamp": -1
}
Interactive clients
Any interactive client - a UI, Jupyter notebook, CLI - can integrate with an OIDC provider. However, the level of support will vary between these tools.
Interactive clients usually fall into one of the following categories:
- Browser-based clients with support for HTTP redirects; this includes the Web Console or any javascript UI
- Applications running in a browser without support for redirects, such as Jupyter notebooks
- Non-browser based clients, usually some kind of command line interface (CLI) or a standalone application, such as Microsoft Access
Browser-based clients
If the tool is browser based and can handle HTTP redirects, it can implement two possible flows to request an access token.:
-
Authorization Code flow (Recommended, more secure)
-
Implicit flow
The Web Console implements the Authorization Code Flow with PKCE, which is a special version of the Authorization Code flow designed for mobile apps and single page applications.
Regardless of which flow is used by the web or mobile application, the requested access token can be used for authentication and authorization when communicating with QuestDB as explained in the above 7th step.
Jupyter notebook
JupyterHub can integrate with OAuth2 providers using OAuthenticator, as described in its documentation. The OAuthenticator documentation also contains examples using different identity providers.
If Jupyter notebooks are used without JupyterHub, one option for OAuth2 integration is to use the Resource Owner Password Credentials (ROPC) flow. It is likely that enabling this flow in your OAuth2 provider will require additional setup.
The Resource Owner Password Credentials flow is legacy, and should be used as a last resort.
We can use the code below to acquire an access token in our notebook:
from urllib import request, parse
import json

url = "https://oidc.provider:443/as/token.oauth2"
data = parse.urlencode( {
    "grant_type": "password",
    "username": "testuser",
    "password": "testpwd",
    "scope": "openid",
    "client_id": "testclient"
} ).encode()
req = request.Request(url=url, data=data)
req.add_header("Content-Type", "application/x-www-form-urlencoded")
with request.urlopen(req) as f:
    body = f.read().decode(f.headers.get_content_charset())
    resp = json.loads(body)
    access_token = resp["access_token"]
This token can be used to authenticate with QuestDB:
query = parse.urlencode({
    "query": "select current_user()"
})
req = request.Request(f"http://localhost:9000/api/v1/sql/execute?{query}")
req.add_header("Authorization", f"Bearer {access_token}")
with request.urlopen(req) as f:
    body = f.read().decode(f.headers.get_content_charset())
    resp = json.loads(body)
    print(resp)
Externalizing credentials
The above example saves the user's credentials into the notebook, potentially exposing them to others. One way to improve this is to use environment variables or files to externalize the username and password.
Here is an example using the dotenv library.
First we need to create a file named .env with the settings:
username=testuser
password=testpwd
Then load it in our notebook, and use it to request tokens:
from dotenv import load_dotenv
import os
from urllib import request, parse
import json

load_dotenv()
user = os.environ.get("username")
pwd = os.environ.get("password")

url = "https://oidc.provider:443/as/token.oauth2"
data = parse.urlencode( {
    "grant_type": "password",
    "username": user,
    "password": pwd,
    "scope": "openid",
    "client_id": "testclient"
} ).encode()
req = request.Request(url=url, data=data)
req.add_header("Content-Type", "application/x-www-form-urlencoded")
with request.urlopen(req) as f:
    body = f.read().decode(f.headers.get_content_charset())
    resp = json.loads(body)
    access_token = resp["access_token"]
Enable ROPC
The Resource Owner Password Credentials flow can be enabled in QuestDB within
server.conf:
acl.oidc.ropc.flow.enabled = true
Note that the flow also has to be configured in the OAuth2/OIDC provider!
Now we can use Basic Authentication to simplify our code. We send the credentials to QuestDB, and the database will validate the credentials against the OAuth2 provider.
from dotenv import load_dotenv
import os
from urllib import request
import base64

load_dotenv()
user = os.environ.get("username")
pwd = os.environ.get("password")

query = parse.urlencode({
    "query": "select current_user()"
})
req = request.Request(f"http://localhost:9000/api/v1/sql/execute?{query}")
b64credentials = base64.standard_b64encode(f"{user}:{pwd}".encode()).decode()
req.add_header("Authorization", f"Basic {b64credentials}")
with request.urlopen(req) as f:
    body = f.read().decode(f.headers.get_content_charset())
    resp = json.loads(body)
    print(resp)
We can also use a postgres client to connect to the database:
QuestDB never persists the user's credentials.
import psycopg as pg
from dotenv import load_dotenv
import os

load_dotenv()
user = os.environ.get("username")
pwd = os.environ.get("password")

conn_str = f"user={user} password={pwd} host=localhost port=8812 dbname=qdb"
with pg.connect(conn_str, autocommit=True) as connection:
    with connection.cursor() as cur:
        cur.execute("select current_user()")
        records = cur.fetchall()
        for row in records:
            print(row)
CLI, standalone applications
When using CLI tools, such as psql, or standalone applications like Microsoft
Access, the best option may be the Resource Owner Password Credentials flow.
The user logs in with their SSO credentials, and the server validates the details with the OAuth2 provider:
% psql -h localhost -p 8812 -U testuser
Password for user testuser:
psql (14.2, server 11.3)
Type "help" for help.

testldap=>
testldap=>
Non-interactive clients
Non-interactive clients are usually jobs or standalone applications, such as a client for ingesting data. It is practical to manage their credentials via an OAuth2 provider too.
As seen in the Jupyter notebook examples, the clients can request a token themselves and then use it to authorise data ingestion:
import json
import os
import requests
import pandas as pd
from dotenv import load_dotenv
from questdb.ingress import Sender

load_dotenv()
user = os.environ.get("username")
pwd = os.environ.get("password")

token_endpoint = "https://oidc.provider:443/as/token.oauth2"
response = requests.post(token_endpoint,
                         data={"grant_type": "password",
                               "client_id": "testclient",
                               "username": user,
                               "password": pwd,
                               "scope": "openid"},
                         headers={"Content-Type": "application/x-www-form-urlencoded"})

response_body = response.content.decode("utf-8")
tokens = json.loads(response_body)
access_token = tokens["access_token"]

conf = f"http::addr=localhost:9000;token={access_token};"
with Sender.from_conf(conf) as sender:
    df = pd.read_csv("data.csv")
    df["ts"] = pd.to_datetime(df["ts"])
    sender.dataframe(df, table_name="foo", at="ts")
Alternatively, a user may rely on QuestDB to authenticate them via the OAuth2 provider when the Resource Owner Password Credentials flow is enabled on the server side:
import os
import pandas as pd
from dotenv import load_dotenv
from questdb.ingress import Sender

load_dotenv()
user = os.environ.get("username")
pwd = os.environ.get("password")

conf = f"http::addr=localhost:9000;username={user};password={pwd};"
with Sender.from_conf(conf) as sender:
    df = pd.read_csv("data.csv")
    df["ts"] = pd.to_datetime(df["ts"])
    sender.dataframe(df, table_name="foo", at="ts")
With acl.oidc.groups.encoded.in.token=true, QuestDB validates the token itself
and reads the user information from it, so the token must be a JWT that passes
Token validation. In the first example above, send the ID
token, tokens["id_token"], instead of the access token, which the provider
often issues for another audience. With
acl.oidc.groups.encoded.in.token=false, QuestDB sends the token to the
provider's User Info endpoint, which some providers refuse for tokens issued to
applications.
Tokens that the provider issues to an application, rather than to a user, often carry the principal and the groups under different claim names. To accept both kinds of token with one configuration, list the claims of both, as described in User and group claims. For Microsoft Entra ID, see Microsoft Entra ID managed identities and service principals.
OIDC for the PGWire endpoint
If the Resource Owner Password Credentials (ROPC) flow is not an option, we can still authenticate via OIDC on the PGWire endpoint. However, in this case the client's responsibility to source the token required for authentication. This method works wherever a Postgres client library is available, including jupyter notebooks.
Token authentication for the PGWire endpoint should be enabled by adding the acl.oidc.pg.token.as.password.enabled=true setting to the server configuration.
The token should be sent in the password field, while the username field should contain the string _sso, or left empty if that is an option:
import psycopg as pg

token = "token_requested_from_the_oauth2_provider"

conn_str = f"user=_sso password={token} host=localhost port=8812 dbname=qdb"
with pg.connect(conn_str, autocommit=True) as connection:
    with connection.cursor() as cur:
        cur.execute('select current_user()')
        records = cur.fetchall()
        for row in records:
            print(row)
User permissions
QuestDB requires additional user information to be able to construct the user's access list.
As a reminder, the access list is the list of permissions that determines what the user can and cannot do.
QuestDB itself does not persist external users, nor their passwords or any other authentication related detail. It keeps the groups of each external user's latest login in memory only, as described in User and group claims.
External users and their authentication methods are managed by the Identity Provider.
Since external users are not managed by QuestDB, permissions cannot be granted to them directly.
Instead, the database expects a list of groups, called the groups claim to be present in the user information.
These external group names are mapped to QuestDB's own groups.
The access list of the external user consists of the permissions granted to those groups:

Mapping user permissions
The mappings between external and QuestDB groups are managed with the following SQL commands:
CREATE GROUP groupName WITH EXTERNAL ALIAS 'CN=TestGroup1,OU=DC Users,DC=ad,DC=quest,DC=dev';
ALTER GROUP groupName WITH EXTERNAL ALIAS 'CN=TestGroup1,OU=DC Users,DC=ad,DC=quest,DC=dev';
ALTER GROUP groupName DROP EXTERNAL ALIAS 'CN=TestGroup1,OU=DC Users,DC=ad,DC=quest,DC=dev';
See CREATE GROUP and
ALTER GROUP for the full syntax.
External users cannot be given a query memory limit directly;
ALTER USER ... SET MEMORY LIMIT is rejected for them. Set the limit on the
mapped QuestDB group instead; see
memory limits.
QuestDB works the list of external groups out from the user information: the
User Info response or, when acl.oidc.groups.encoded.in.token is true, the
token's payload.
If we take the example used earlier, we will see that the message contains a
claim called groups. This name is configurable in QuestDB, and QuestDB can
fall back to other claims when a token does not carry it. See
User and group claims.
If the groups claim is missing or holds no group name, QuestDB rejects the login.
If none of the user's groups is mapped to a QuestDB group, the user is authenticated, but has no permissions at all.
The user has to have at least the HTTP permission to be able to successfully
login via the Web Console.
{
  "sub": "externalUser",
  "name": "External User",
  "groups": [
    "CN=TestGroup1,OU=DC Users,DC=ad,DC=quest,DC=dev",
    "CN=TestGroup2,OU=DC Users,DC=ad,DC=quest,DC=dev"
  ]
}
Any change made to the user's group membership in the Identity Provider, QuestDB will adjust the user's access list.
There may be a slight delay due to the User Info Cache.
QuestDB will use the cached information until it becomes stale, and gets updated.
The same stands for changes made to the user's status within the Identity Provider.
For example, a disabled user will not be kicked out of QuestDB immediately.
The acl.oidc.cache.ttl config option drives how often user information should
be synchronized with the Identity Providers.
It should be set accordingly to your organization's policies.
With acl.oidc.groups.encoded.in.token=true, QuestDB reads the groups from the
token instead of asking the Identity Provider, so refreshing the cache does not
pick up changes. A change to the user's groups or status takes effect when the
client presents a new token. A token that QuestDB has already accepted stays
valid until it expires, as described in Token validation.
User and group claims
QuestDB reads two values from the user information of an external user: the
principal, which identifies the user, and the groups the user belongs to. The
user information is the response of the User Info endpoint or, when
acl.oidc.groups.encoded.in.token is true, the payload of a JWT: the ID
token, which the Web Console sends and QuestDB obtains itself in the ROPC flow,
or a token that a client presents, such as an Entra ID app-only access token.
acl.oidc.sub.claimnames the claim that carries the principal,subby default. The principal identifies the user in the Web Console, in the server logs, and in the result ofcurrent_user().acl.oidc.groups.claimnames the claim that carries the groups, as an array of group names or as a single group name. It has no default and must be set when OIDC is enabled.
QuestDB rejects the login when the user information carries no principal or no group.
The principal must be unique for each user and service. QuestDB keeps one external user for each principal, in memory, and every login replaces the groups of that user with the groups of the login. Two people who resolve to the same principal share one QuestDB user, and a session that is already open, such as a PGWire connection, can run with the groups of whoever logged in last. Pick a claim that the provider keeps unique, such as a username or an object ID, not a display name. Changing the claim on an existing deployment gives every user a new principal. Permissions stay the same, because they come from the groups.
This section describes QuestDB Enterprise 4.0.2 and later. Claim lists require 4.0.2: on earlier versions, a claim list makes every OIDC login fail. For the other differences, see Versions before 4.0.2.
Fallback claim lists
Both settings accept a comma-separated list of claim names in priority order,
so one configuration can accept tokens that carry the principal and the groups
under different claim names. Tokens issued to users and tokens issued to
applications often differ this way. For example, Microsoft Entra ID user
tokens, configured as in the Entra ID guide, carry
preferred_username and groups, while its
app-only tokens carry
oid and roles:
acl.oidc.sub.claim=preferred_username,oid
acl.oidc.groups.claim=roles,groups
QuestDB takes the principal from the first claim on the list that carries a non-empty value, and the groups from the first claim on the list that carries at least one group name. With the configuration above, QuestDB reads these two token payloads, shortened to the relevant claims, as follows:
{
  "sub": "AAAAAAAAAAAAAAAAAAAAAIkzqFVrSaSaFHy782bbtaQ",
  "oid": "6f2d8c4e-31a7-4b5e-9c0d-8e1f2a3b4c5d",
  "preferred_username": "jane.smith@example.com",
  "groups": ["87654321-1234-1234-1234-123456789abc"]
}
{
  "sub": "4c9a4e3b-0d6f-4f43-9a8e-27d2b1f0c5a1",
  "oid": "4c9a4e3b-0d6f-4f43-9a8e-27d2b1f0c5a1",
  "roles": ["QuestDB.Ingest"]
}
| Token | Principal | Groups |
|---|---|---|
| User | jane.smith@example.com, from preferred_username | 87654321-..., from groups |
| App-only | 4c9a4e3b-..., from oid | QuestDB.Ingest, from roles |
roles comes before groups because an app-only token can also carry a
groups claim, and QuestDB takes the groups from the first claim on the list
that holds one. See
Microsoft Entra ID managed identities and service principals.
How QuestDB picks a claim
The following rules decide which claim QuestDB uses, for a single claim name and for a list:
- The order of the list decides, not the order of the claims in the token.
With the configuration in Fallback claim lists, a
token that carries both
rolesandgroupsgets its groups fromrolesalone. QuestDB does not combine groups from several claims. - A claim that is missing,
null, or empty falls through to the next claim on the list. Empty means an empty string, or an empty array for a groups claim. The string"null"counts as missing too. - Group names that are
nullor empty are skipped. A groups claim that holds nothing else falls through to the next claim. - Only top-level claims count. A claim nested in another claim is ignored,
such as the
rolesthat Keycloak puts inside itsrealm_accessclaim. To use such values, configure the provider to emit them as a top-level claim. - Claim names are case-sensitive.
- A listed claim must have the expected shape: a single value, such as a string, for the principal, and a single value or a flat array of values for the groups. A listed claim of any other shape, such as an array in a principal claim or an object in a groups claim, fails the login, even when a claim earlier on the list carries a value.
- Claims that are not listed are ignored, whatever their shape.
With acl.oidc.groups.encoded.in.token=true, QuestDB validates the token before
it applies these rules. See Token validation.
Startup validation
With OIDC enabled, QuestDB checks both settings at startup. Spaces around claim
names are trimmed and empty entries are skipped, so
preferred_username, oid,,sub reads as preferred_username,oid,sub. QuestDB
refuses to start when:
acl.oidc.groups.claimis not set, or either setting is empty:required property is not set: acl.oidc.groups.claim, or the same message foracl.oidc.sub.claim. An emptyacl.oidc.sub.claimdoes not fall back to the defaultsub.- A setting lists the same claim twice:
claim is listed more than once in acl.oidc.sub.claim [claim=oid]. - Both settings list the same claim:
claim cannot be listed in both acl.oidc.sub.claim and acl.oidc.groups.claim [claim=oid].
Token validation
With acl.oidc.groups.encoded.in.token=true, QuestDB validates the token
itself before it reads any claim:
- The token must be a JWT whose
kidheader names one of the signing keys that the provider publishes. - Its
audclaim must matchacl.oidc.audience, which defaults to the client ID. QuestDB accepts a single audience. - It must carry an
expclaim that has not passed. QuestDB allows 60 seconds of clock skew. - It must carry a non-empty
subclaim, whatever claimsacl.oidc.sub.claimlists.
QuestDB does not check the issuer (iss) or the tenant of the token. It
accepts any token that the provider's keys sign for the expected audience, so
make sure that no one outside your organization can obtain tokens for the
QuestDB application. With Microsoft Entra ID, register the application as
single-tenant, as described in
Set up the client application in Entra ID.
QuestDB checks a token when a request or a connection authenticates with it,
and caches the result for up to
acl.oidc.cache.ttl. A token can
therefore be accepted for up to 60 seconds plus acl.oidc.cache.ttl after it
expires. An open PGWire or WebSocket connection stays open when its token
expires, but QuestDB rejects a new connection that presents an expired token.
With acl.oidc.groups.encoded.in.token=false, QuestDB sends the token to the
provider's User Info endpoint, which validates it. See
Find user information.
Rejected logins
When the user information carries none of the listed principal claims, or none
of the listed groups claims, QuestDB rejects the login. HTTP clients receive
401 Unauthorized, and PGWire clients receive invalid username/password. The
server log contains Failed to find required claims, followed by both lists
and the user information QuestDB received:
Failed to find required claims [subClaims=[preferred_username,oid], groupsClaims=[roles,groups], userInfo={...}]
Compare the claims in userInfo with the two lists to find the claim names
that your provider uses. A listed claim of an unexpected shape, such as an
object in a groups claim, is logged as
Request failed [error=unexpected input format ...] instead. With Microsoft
Entra ID, a user who belongs to more than 200 groups gets no groups claim in
the token, so QuestDB rejects the login unless another listed claim carries
groups.
A token that fails token validation is rejected the same way, but the server log gives the reason instead of the claim lists, for example:
Request failed [errorMsg=Failed to decode JWT token Error(InvalidAudience)]
Request failed [errorMsg=Failed to decode JWT token Error(ExpiredSignature)]
InvalidAudience usually means that the token was requested for another API,
or that Entra ID issued a v1.0 access token. See
Microsoft Entra ID managed identities and service principals.
Don't set acl.oidc.audience to the Application ID URI to work around it:
QuestDB accepts a single audience, and the ID tokens of Web Console users carry
the application ID, so their logins would fail.
With acl.oidc.groups.encoded.in.token=false, the provider's User Info
endpoint rejects a token that is invalid or expired, and QuestDB rejects the
login.
If the login succeeds but every request is denied, check that at least one of the user's groups is mapped to a QuestDB group that has the endpoint permission. See Mapping user permissions.
Versions before 4.0.2
QuestDB Enterprise versions before 4.0.2 differ as follows:
- They read the whole value of each setting as a single claim name, so a claim list makes every OIDC login fail.
- With
acl.oidc.groups.encoded.in.token=true, they reject any token that does not carry agroupsarray, whateveracl.oidc.groups.claimnames. They do not check theexpclaim, so they accept expired tokens and tokens without anexpclaim. - They read a
nullclaim as the valuenull. Every account whose principal claim isnulllogs in as the same principal,null, andnulland empty group names count as groups. - They reject a login when a claim that is not listed holds an array of objects or nested arrays.
- They start with an empty
acl.oidc.sub.claim, or with the same claim in both settings, and then reject every OIDC login.
Configuration options
For all OIDC-related configuration options of QuestDB, see Configuration.
Active Directory
The following sections are guides for setting up single sign-on (SSO) with various OAuth2 providers, and for authenticating services with app-only tokens from Microsoft Entra ID.
PingFederate
This document helps set up SSO authentication for the Web Console in PingFederate.
It is assumed that the Azure Active Directory serves as the Identity Provider (IdP).
Set up PingFederate client
First thing first, let's pick a name for the client!
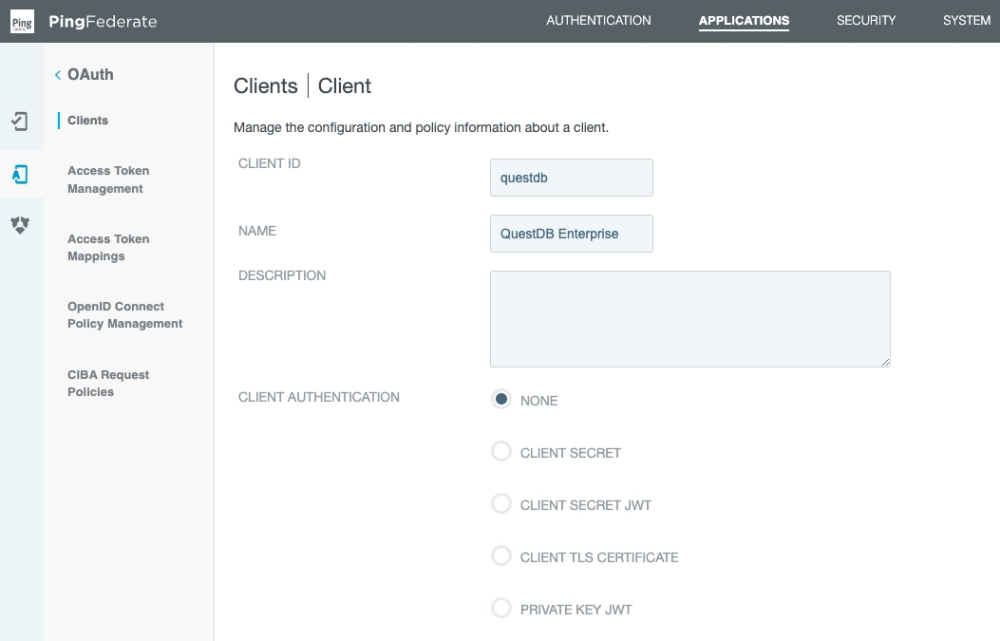
The QuestDB Web Console is a SPA (Single Page App).
As a result, it cannot store safely a client secret.
Instead it can use PKCE (Proof Key for Code Exchange) to secure the flow.
As shown above, leave the client authentication disabled.
We also have to white list the URL of the Web Console as a redirection URL:

We can instruct PingFederate to automatically authorize the scopes requested by the Web Console.
The user will not be presented the extra window asking for consent after authentication:

The Web Console uses the Authorization Code Flow, and refreshes tokens automatically.
Next, enable the grant types required for this flow:
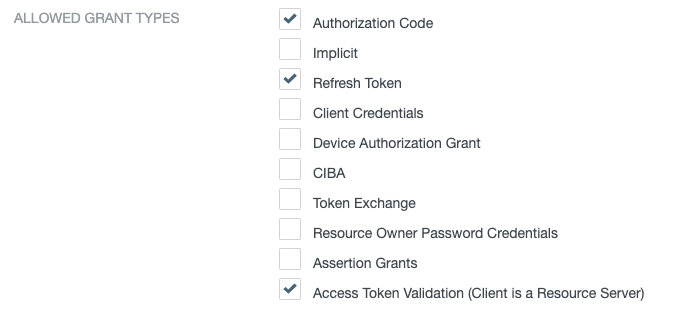
We've selected:
- Authorization Code
- Refresh Token
- Access Token Validation (Client is a Resource Server)
After that, select the token manager for the client.
The token manager is responsible for issuing access tokens.
All token related settings should be configured in the token manager.
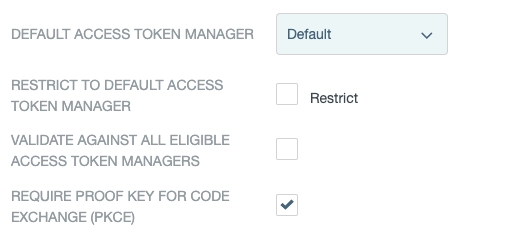
Finally, enable PKCE - as shown above - and save the settings.
Access Token Manager settings
QuestDB does not require any special setup regarding the access token.
We recommend that you do not to use shorter tokens than the default 28 characters.
As the QuestDB Web Console refreshes the token automatically, there is no need for long-lived tokens:
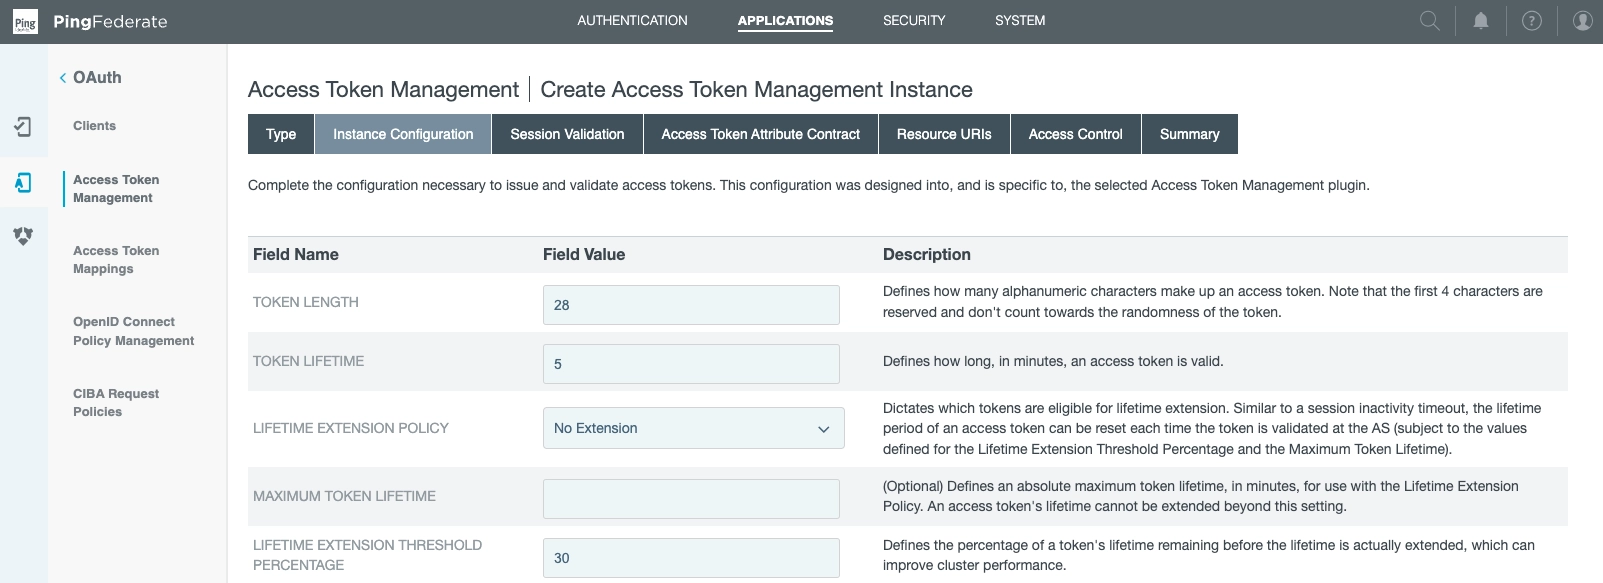
We've selected:
- Token length: 28
- Token lifetime: 5
- Lifetime extension policy: None
- Maximum token lifetime: Null
- Lifetime extension threshold percentage: 30
For the next step, we tune the Authorization Server.
Authorization Server settings
These settings relate to the authorization code, refresh token and CORS.
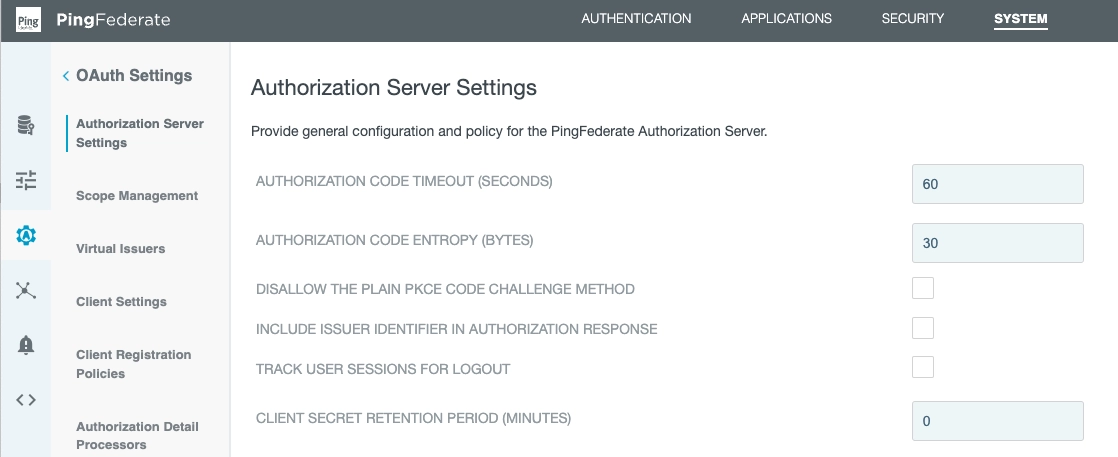
In this section, we've entered:
- Authorization code timeout: 60
- Authorization code entropy: 30
- Client secret retention period: 0
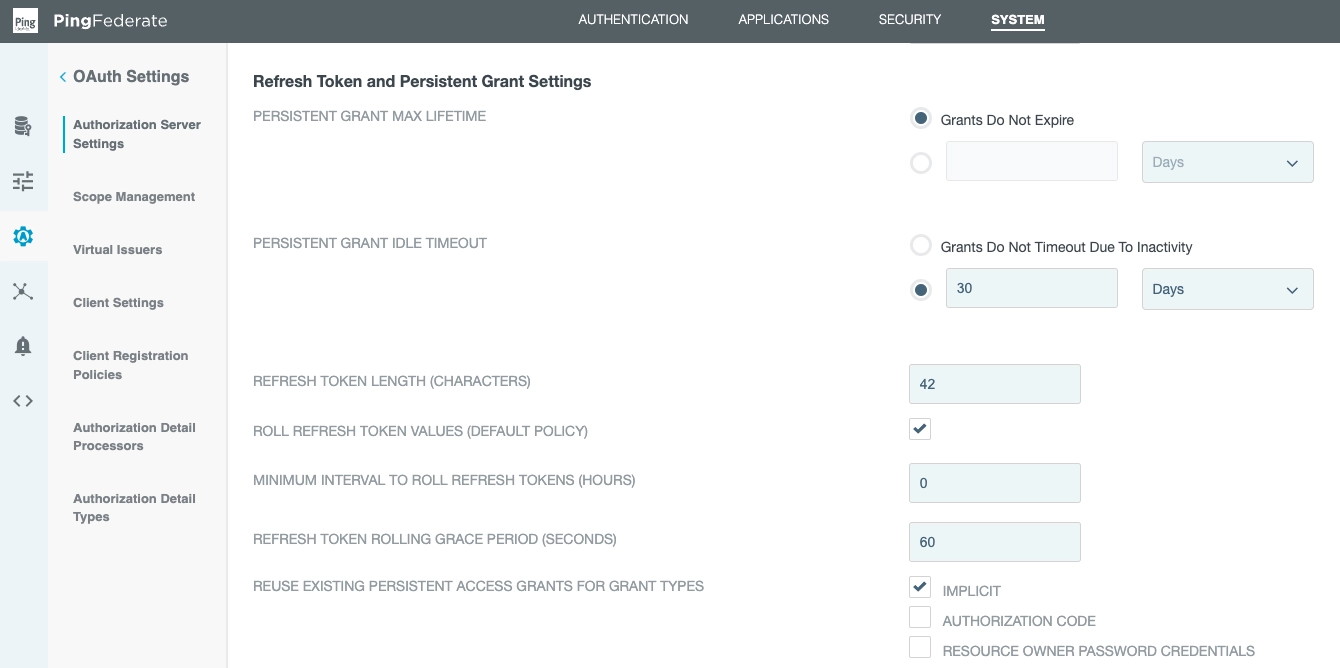
Next, ensure the ROLL REFRESH TOKEN VALUES option is selected:
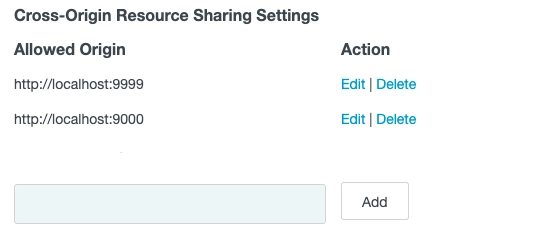
It is also important to whitelist the Web Console's URL on the CORS list:
Set up a Microsoft Entra ID Data Source
PingFederate needs a Data Source setup.
This is a secure LDAP connection to Microsoft Entra ID, formerly known as Azure Active Directory.
The data source needs a:
- name
- hostname
- port
- username and password for the LDAP connection
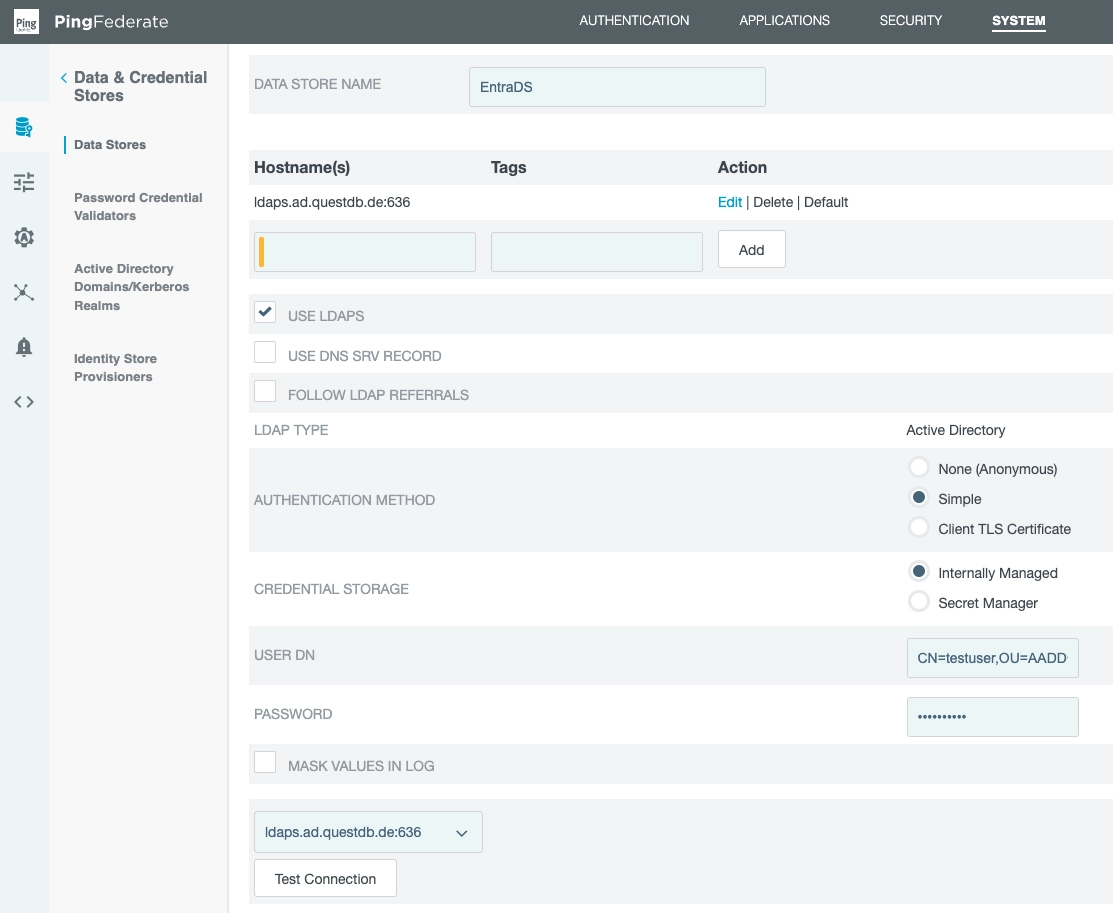
We have given it the name EntraDS and it will be applied later.
Set up a Password Credential Validator
Now that PingFederate has an LDAP connection, we can use it for authentication.
First, create a Password Credential Validator:
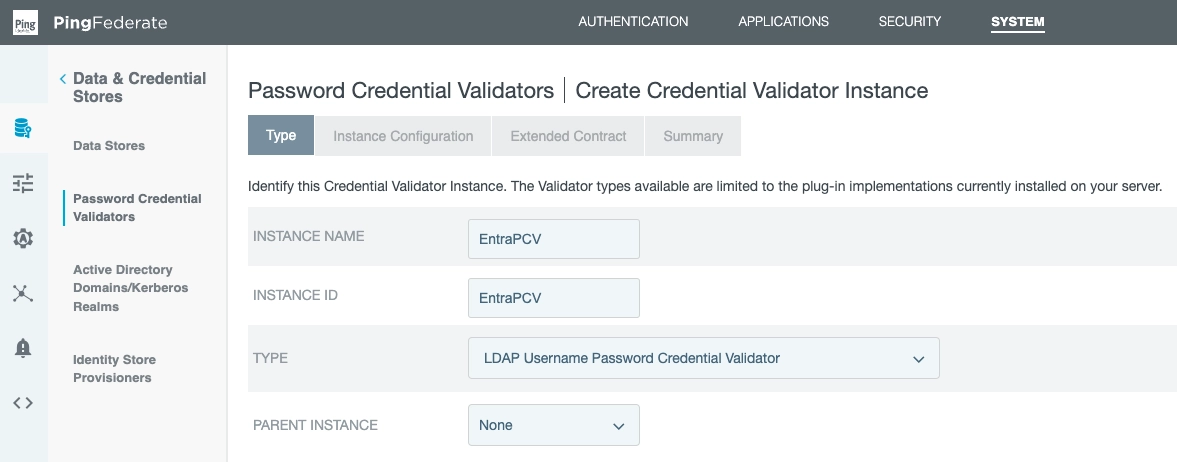
We've entered:
- Instance name: EntraPCV
- Instance ID: EntraPCV
- Selected: LDAP Username Password Credential Validator
- Parent instance: None
Furthermore, we now declare our previously created data source (EntraDS):
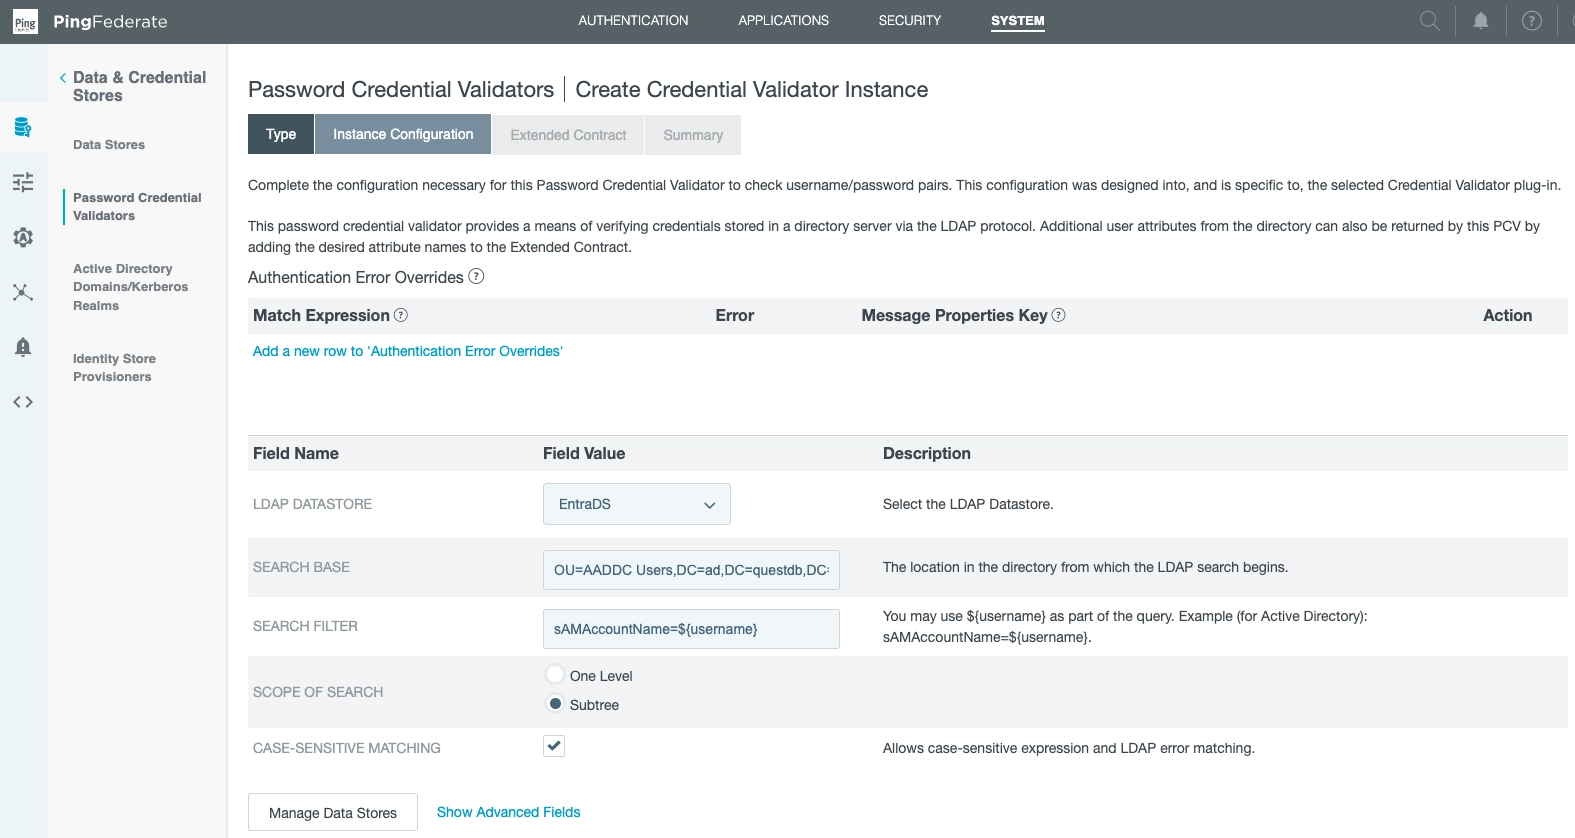
This links our data store (EntraDS) to our PCV (EntraPCV).
Set up an Identity Provider
We can use our PCV once we set up an Identity Provider.
The IdP will be used to authenticate users against Active Directory using the LDAP connection.
We do this in the Type subsection:
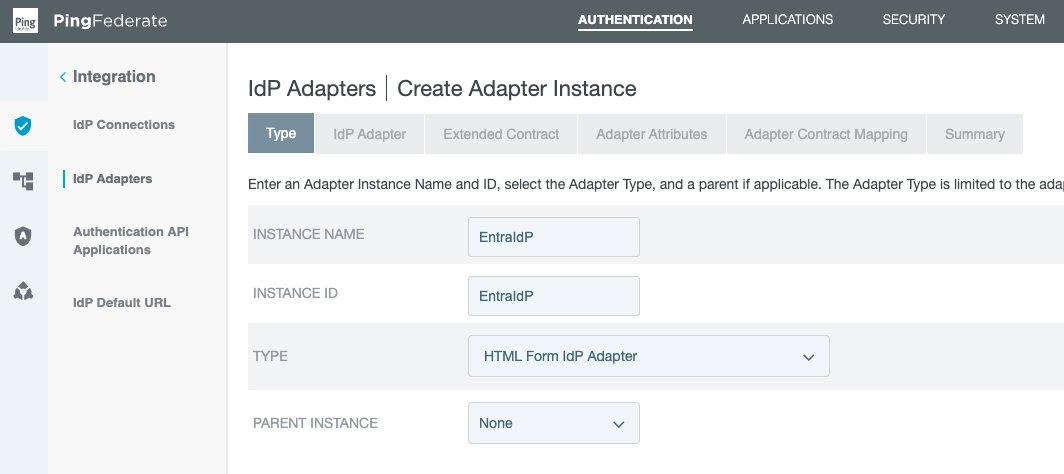
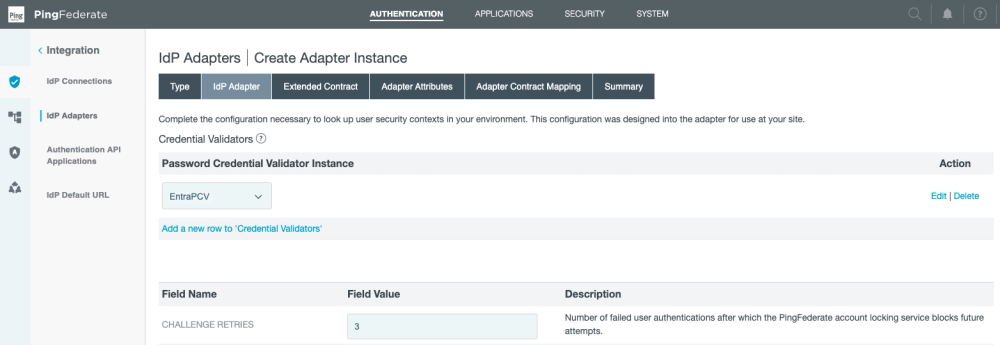
Next, in the IdP Adapter section...
Click: Add a new row to Credential Validators.
Select the PCV (EntraPCV) we created.
Optionally alter number of retries:
Add groups to OIDC policy management
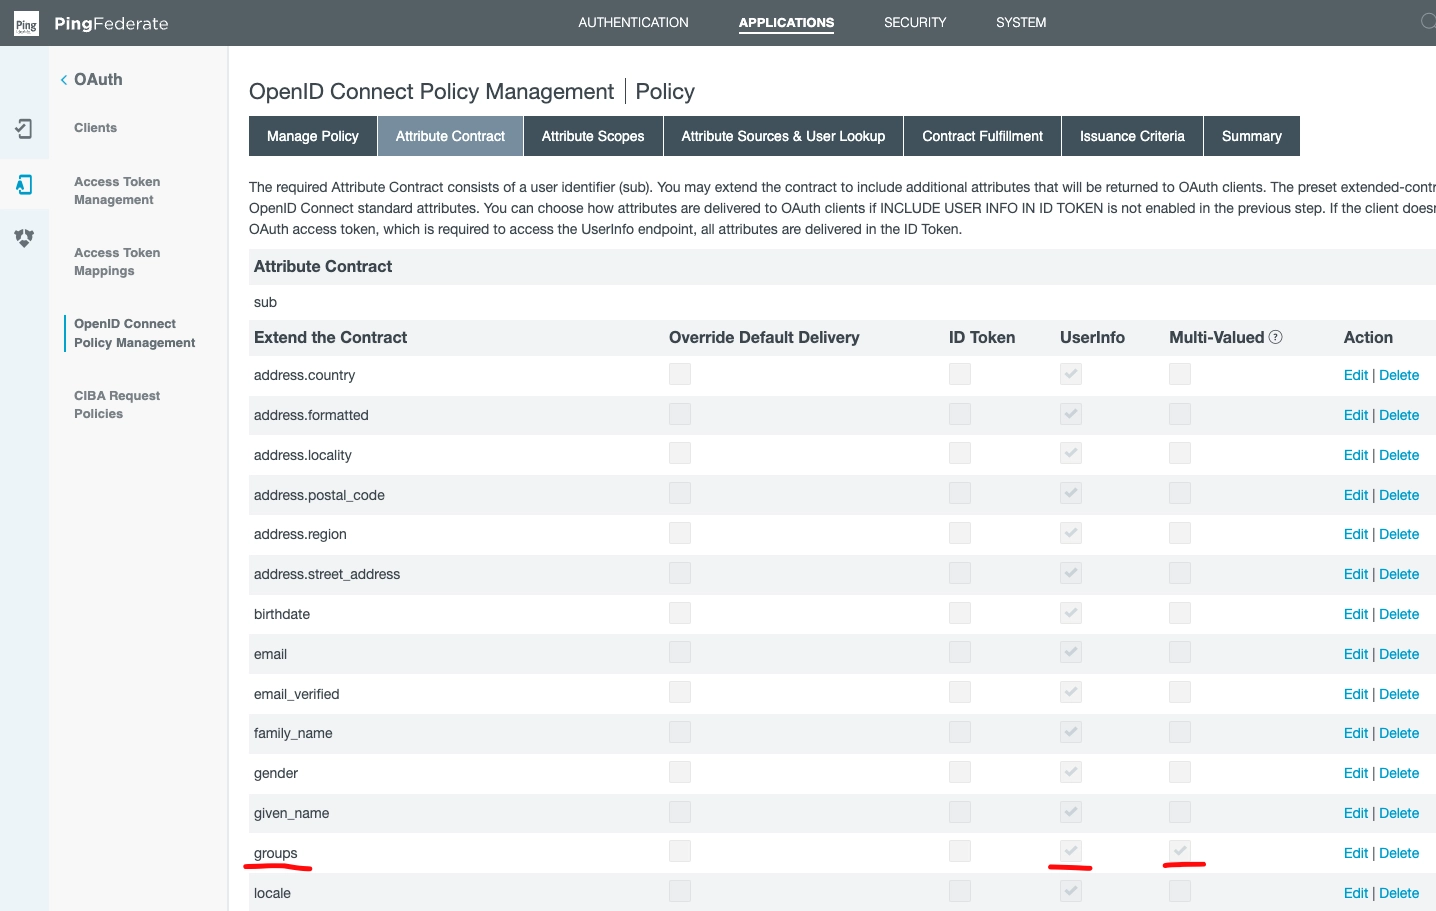
QuestDB now needs to know about the user's AD group memberships to find their permissions.
Groups are passed to QuestDB inside the User Info object in a custom claim.
This has to be added in the OpenID Connect Policy Management.
The field is Multi-Valued, because it is a list of group names.
Under the Attribute Contract subsection, see:
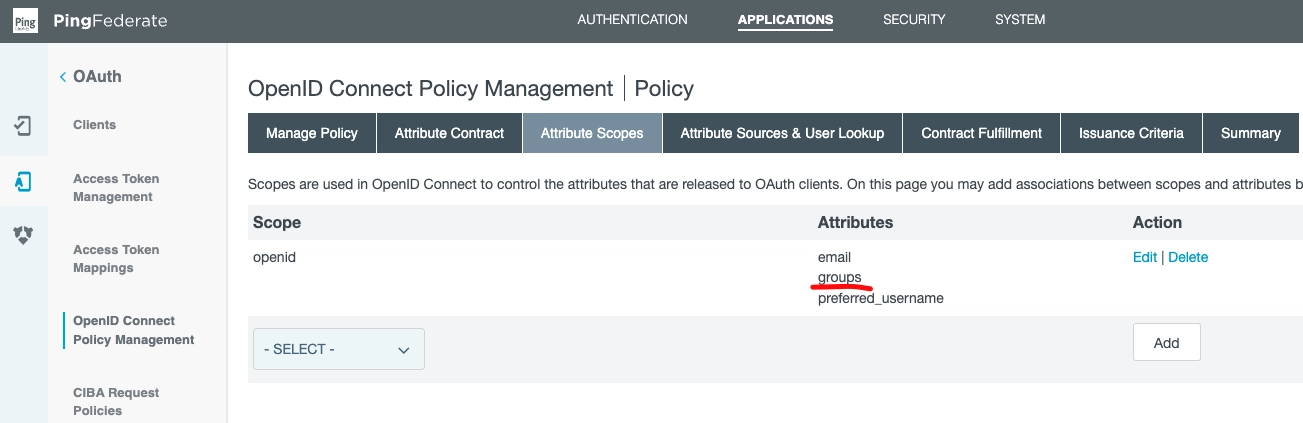
Next, click to the Attribute Scopes subsection.
Ensure groups is among the openid attributes:
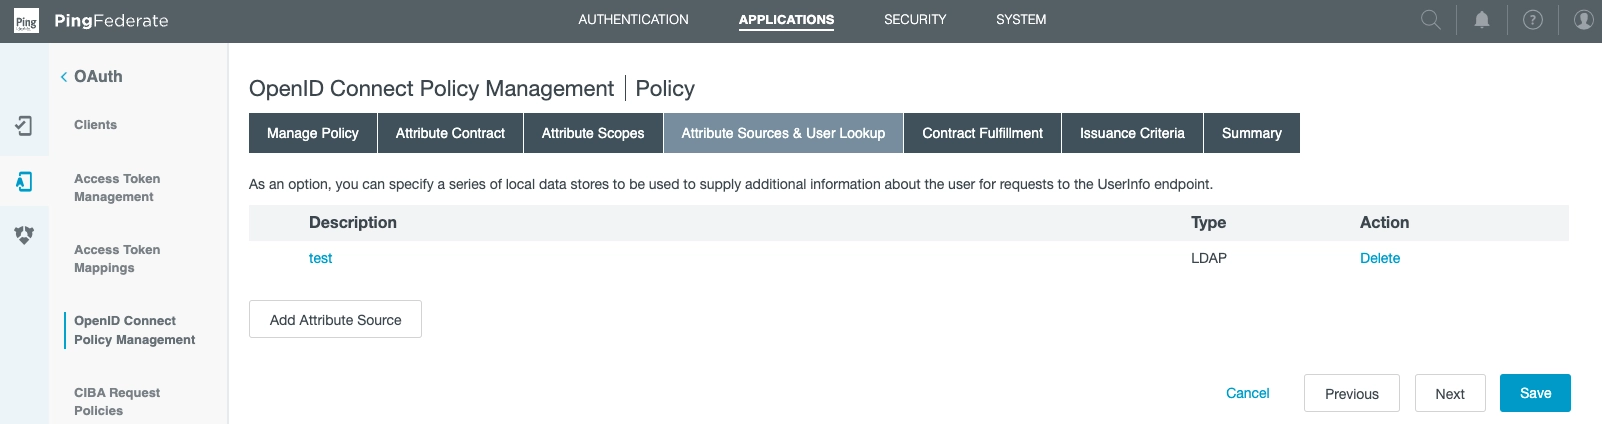
Onwards to the Attribute Sources & User Lookup Section.
From this view, you can add local data stores.
Note item test of type of LDAP:
We created it via the following choices in Add Attribute Source:
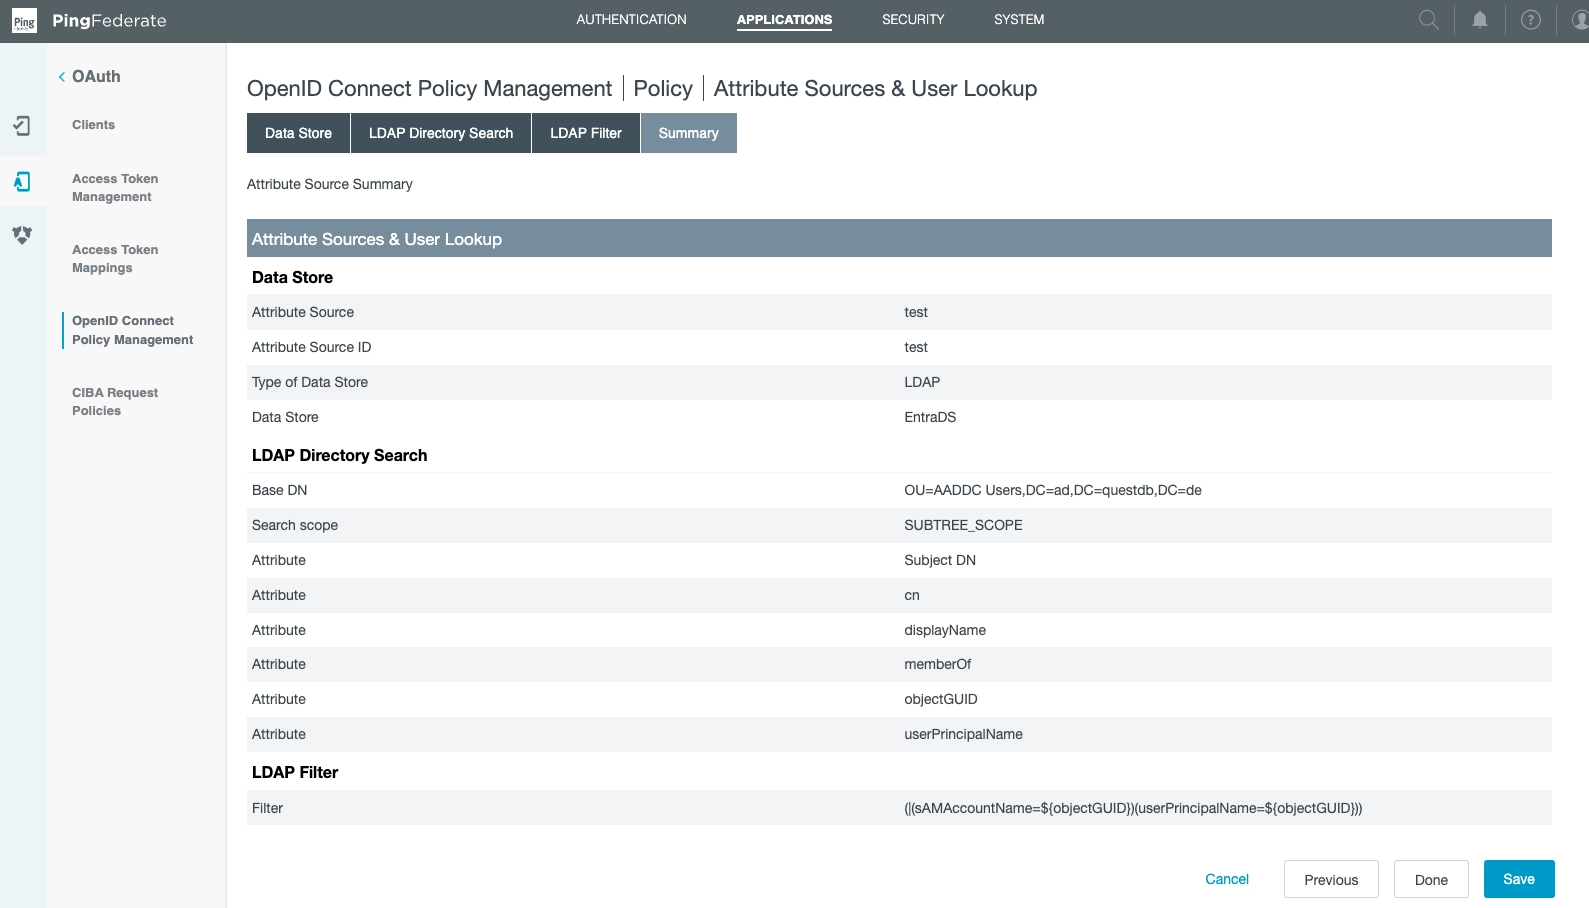
Note where we specified the Data Store (EntraDS).
This is also where the directory search parameters are defined.
Back at the Attribute Sources & User Lookup Section section, note we have set
email.
The source is LDAP (test), while the value is usePrincipalName:
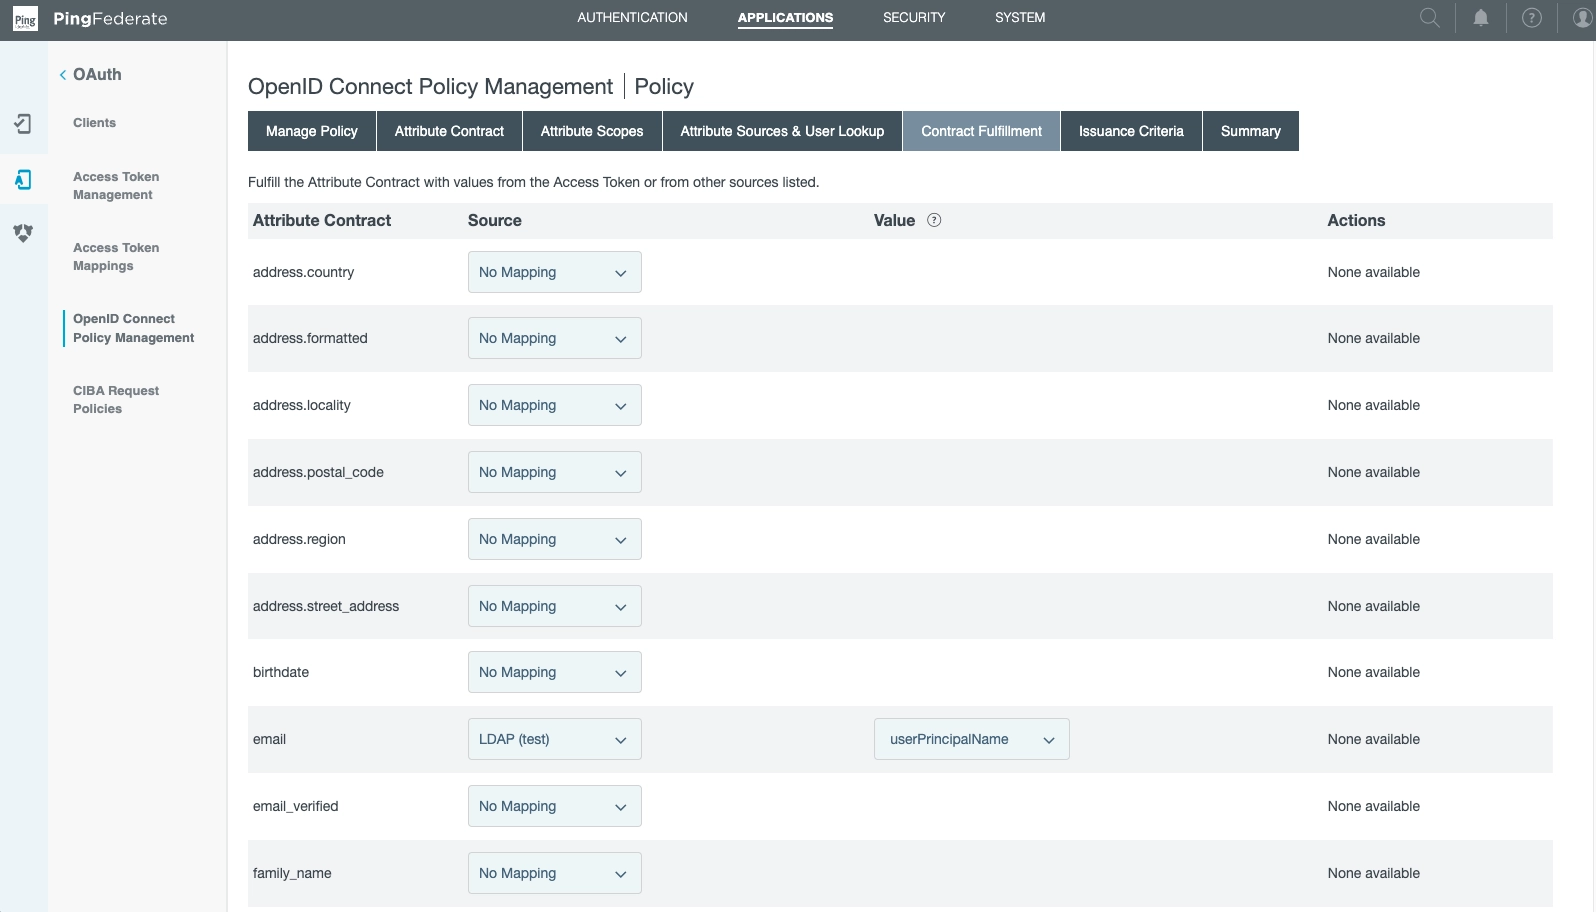
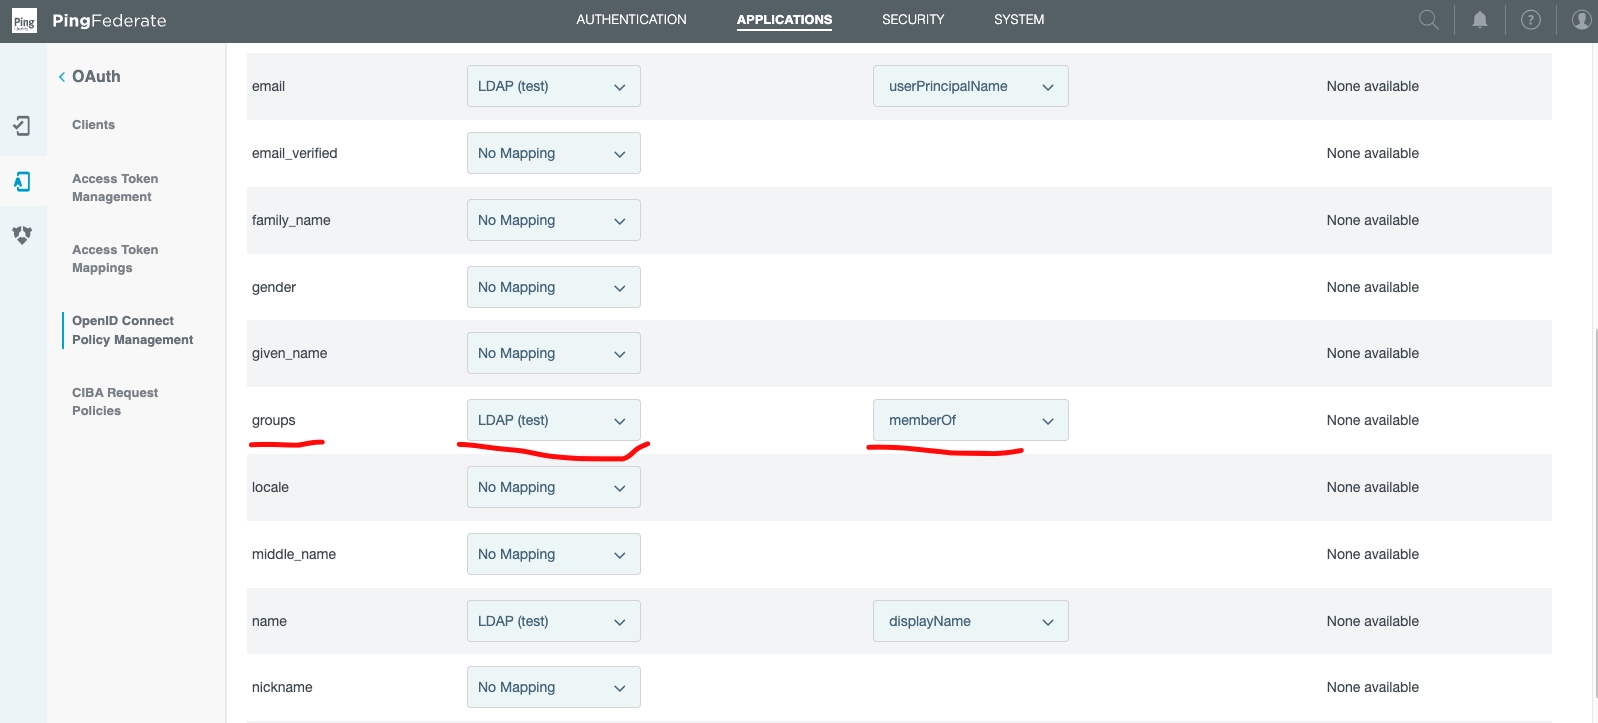
And finally!
In the same Attribute Sources & User Lookup Section...
Find groups.
Note the definition of Source (LDAP (test)) that bridges our various parts.
The value is memberOf.
Enable Resource Owner Password Credentials (ROPC) flow
As described in the
OIDC operations document
tools - such as psql - can be integrated with the OIDC provider using the ROPC flow.
When setting this flow up, enable the Resource Owner Password Credentials flow in the client settings.
Next, create a Resource Owner Credentials Grant Mapping to map values obtained from the Password Credential Validator (PCV) into the persistent grants.
When setting this up, select the previously created LDAP Data Source and IdP Adapter, which links to the existing PCV.
Then select the username attribute of the PCV as USER_KEY.
Confirm QuestDB mappings and login
QuestDB requires a mapping, as laid out in the OIDC operations document.
If a given user has the HTTP permission, they will be able to now login via the Web Console.
To test, head to http://localhost:9000 and login.
If all has been wired up well, then login will succeed.
Microsoft Entra ID
This document sets up SSO authentication for the QuestDB Web Console in Microsoft Entra ID, formerly known as Azure AD.
To also let services that run as a managed identity or a service principal call QuestDB with app-only tokens, complete this setup, then follow Microsoft Entra ID managed identities and service principals.
To enlarge the images, click or tap them.
Set up the client application in Entra ID
First thing first, let's pick a name for the client!
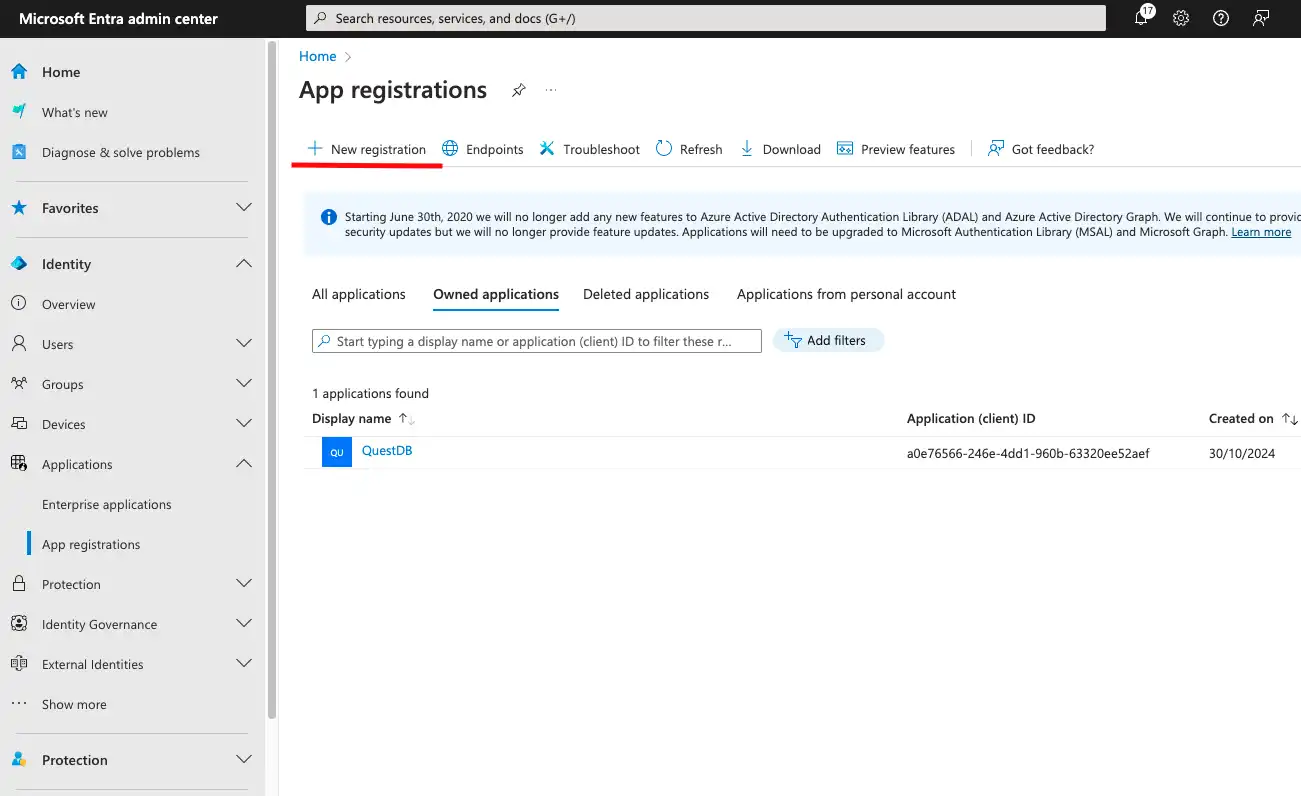
Then head to Microsoft Entra Admin Center, and register the application under Identity - App registrations - New registration.
Under Supported account types, select Accounts in this organizational directory only. QuestDB does not check which tenant issued a token, so the application must not accept accounts from other tenants. See Token validation.
The QuestDB Web Console is a SPA (Single Page App).
As a result, it cannot store safely a client secret.
Instead, it can use PKCE (Proof Key for Code Exchange) to secure the flow.
When registering the application, select the SPA platform.
We also have to specify the URL of the Web Console as Redirect URI.
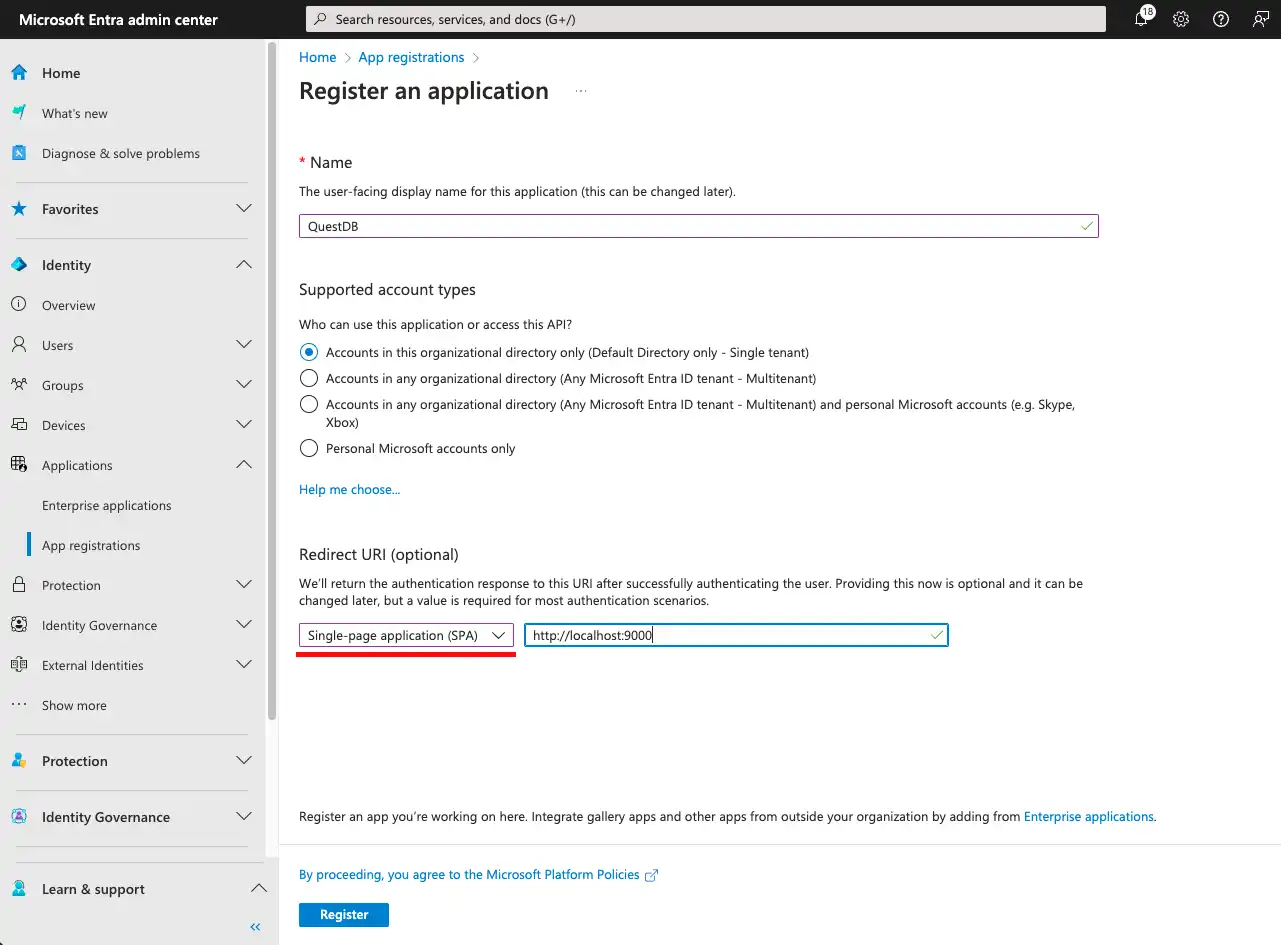
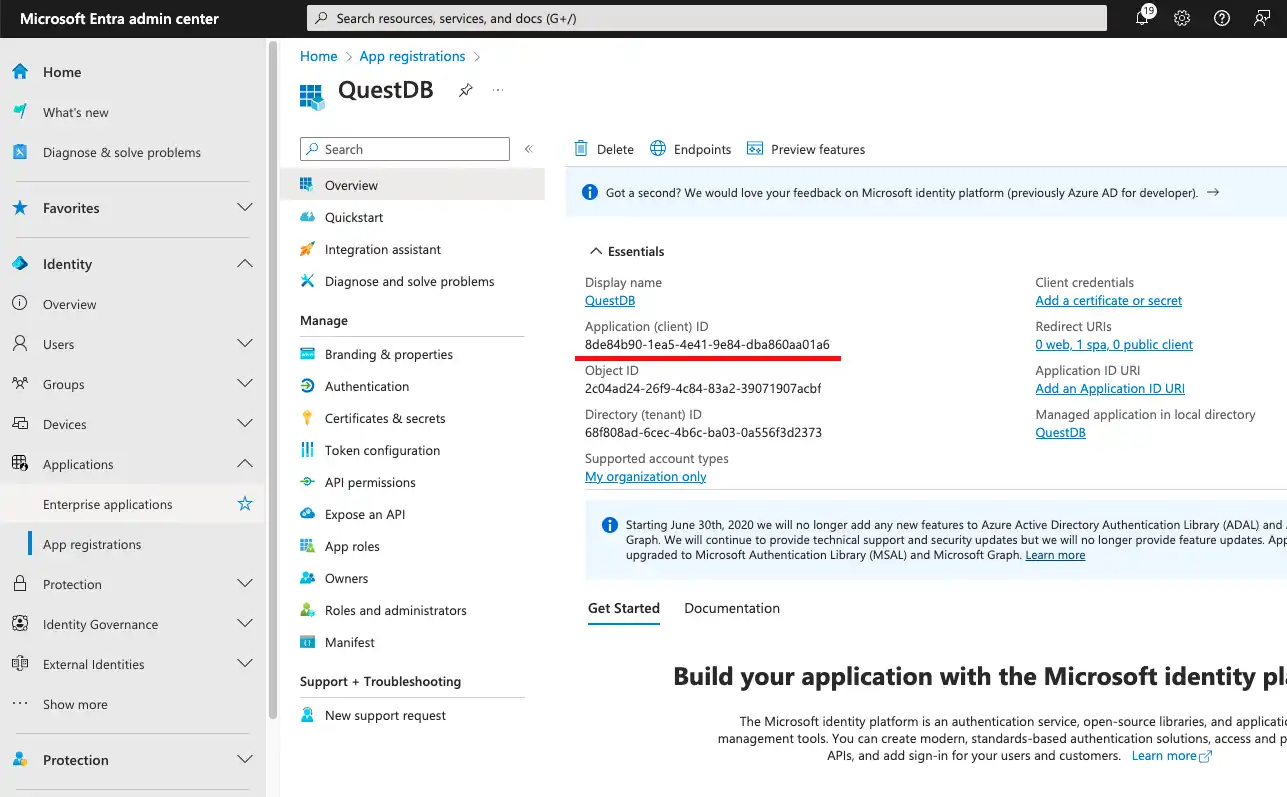
After clicking Register, we have created a client application with the name QuestDB.
Each application is assigned a unique id (known as Client ID in the OAuth2 - OIDC standard). The client will identify itself with this id when sending requests to Entra ID.
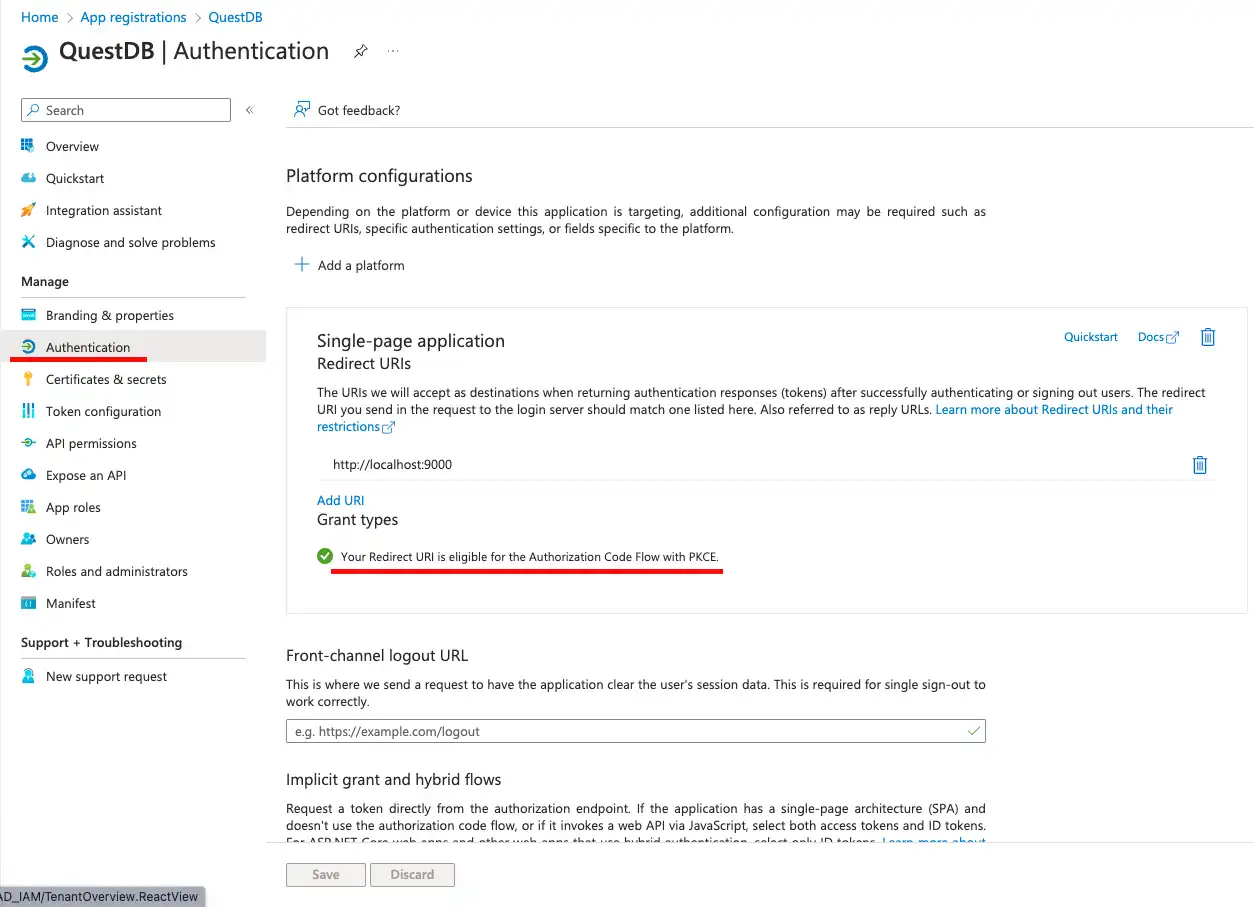
We find the platform configurations under Authentication. This is the place where the previously set redirect URI can be viewed and modified. We can also specify additional redirect URIs, if necessary.
The redirect URIs of the application are automatically eligible for the Authorization Code Flow with PKCE, which is a special version of the OAuth2 standard's Authorization Code Flow. It is specifically designed for applications where a client secret (e.g. a password) could not be kept safely. As single page applications run in the browser, they fall into this category.
The redirect URIs are also added to the CORS (Cross-Origin Resource Sharing) policy of Entra ID. CORS is a mechanism to allow a web page, such as the Web Console, to access resources from a different domain than the one that served the page. In this context this means that we let the Web Console to access Entra ID, while its origin is the HTTP endpoint of QuestDB.
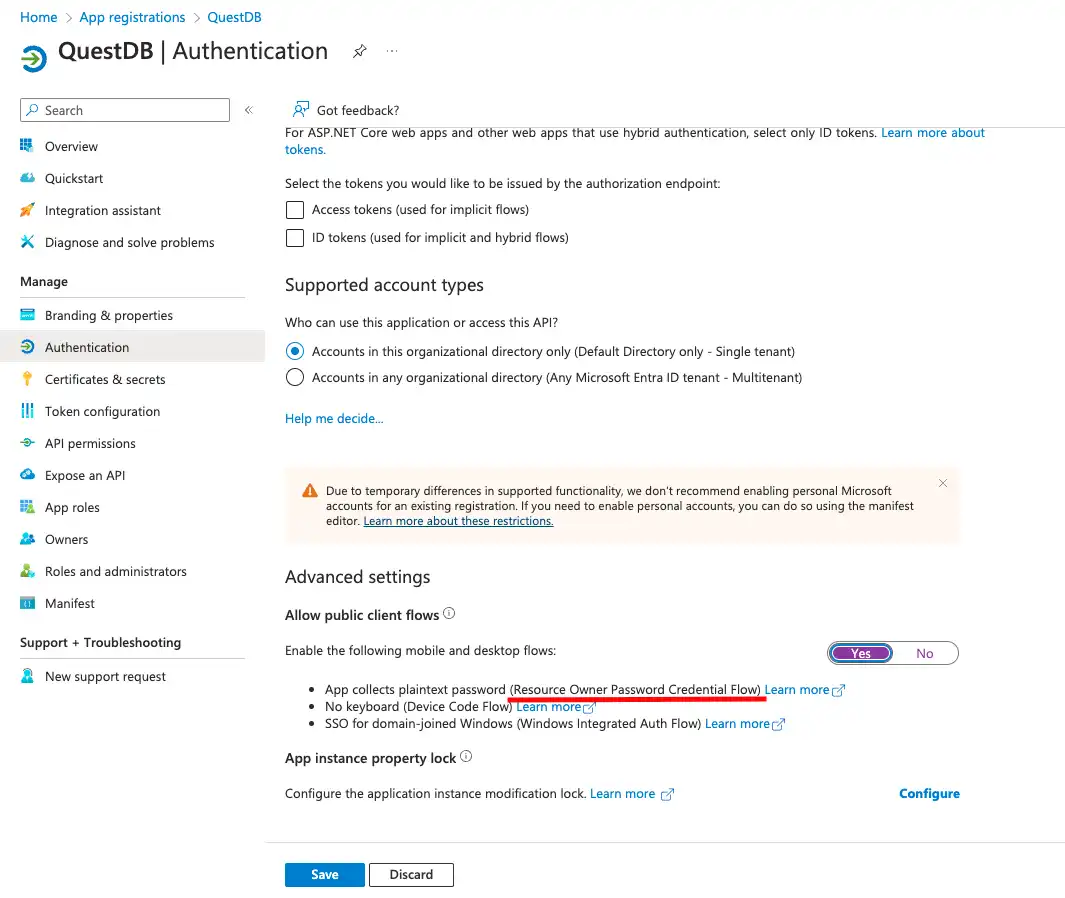
If we scroll down to the bottom of this page, we can also find a section where we can enable the Resource Owner Password Credential Flow.
This OAuth2 flow is legacy, and should be enabled only if there is a requirement of connecting to QuestDB using SSO (Single Sign-On) via clients not supporting redirect based web flows. This could mean a Postgres client without OAuth2 integration, such as psql, or a standalone in-house client application, or could be just a jupyter notebook.
The main issue with this flow is that the client application has to be trusted with the user's login details. The user's credentials are passed to the application, in this case to QuestDB, and the client application uses these credentials to authenticate the user by forwarding them to the identity provider, in this case to Entra ID.
It is guaranteed that QuestDB does not store the user's credentials in any way. They are not persisted into the database, not even in encrypted form. The login details are treated as passthrough information. Only exception is that server logs can contain the username, logged for audit purposes.
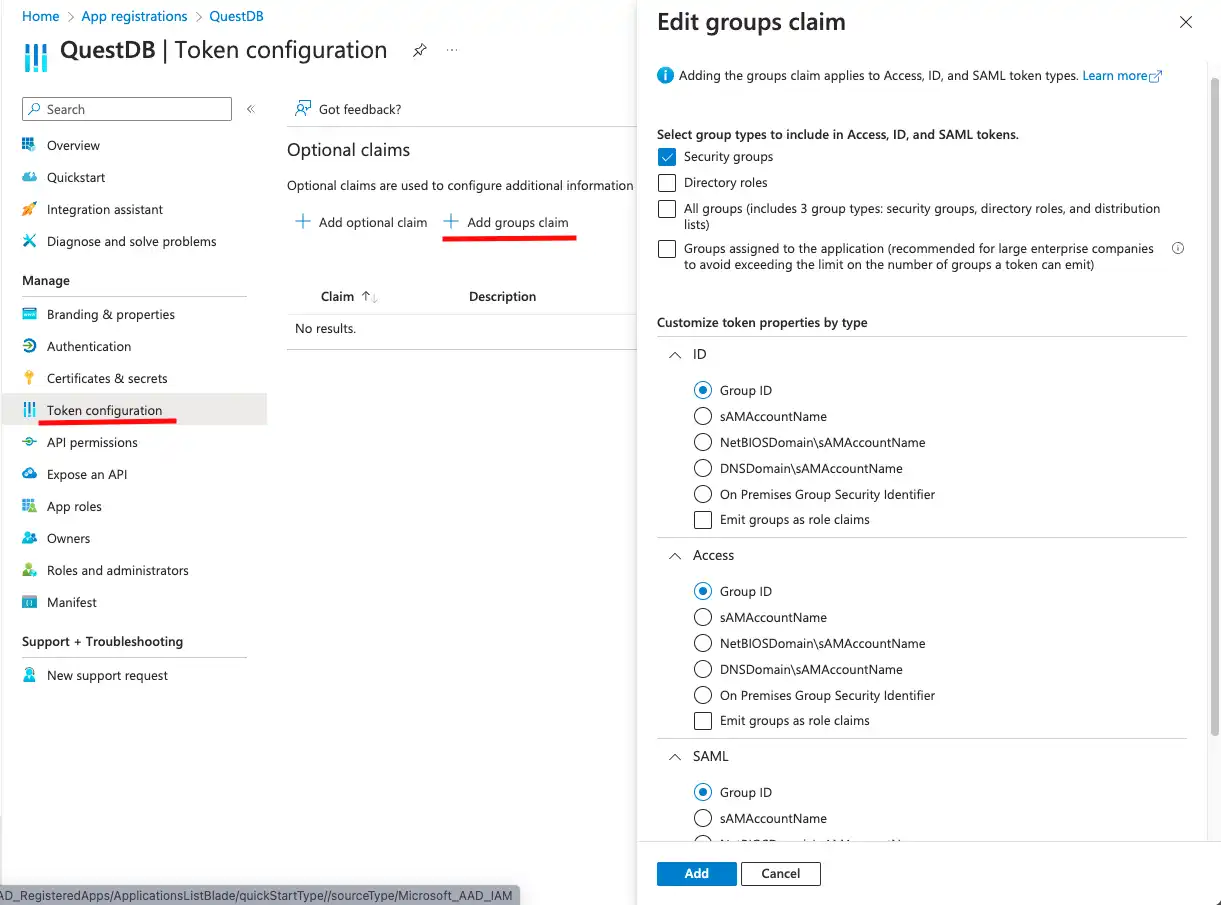
Our next stop is the Token configuration, where the OAuth2/OIDC access and ID tokens can be customized.
Note that users can be authenticated without customized tokens, but authorization would prove to be challenging. The user's security groups are not included in the tokens by default.
QuestDB can be configured to request the user's groups from the UserInfo endpoint of the OAuth2 server, but Entra ID cannot be configured to provide this information via the UserInfo endpoint. Therefore, we choose to customize the tokens, QuestDB will decode and validate the ID token, and take the group information from there.
QuestDB authorization relies on receiving the group memberships of the user. Entra ID groups should be mapped to QuestDB groups, and permissions can be granted to the QuestDB groups. Detailed information about group mappings can be found in the OIDC integration documentation.
The customized tokens contain user information which cannot be accessed without permission. User information is provided by Microsoft Graph, so the client application needs specific permissions to access Microsoft Graph APIs.
These permissions can be configured under API permissions. It is important to note that we will be setting Delegated permissions here, meaning we are not granting actual permissions to access user data. Instead, each user logging into QuestDB will have to consent to accessing their user profile.
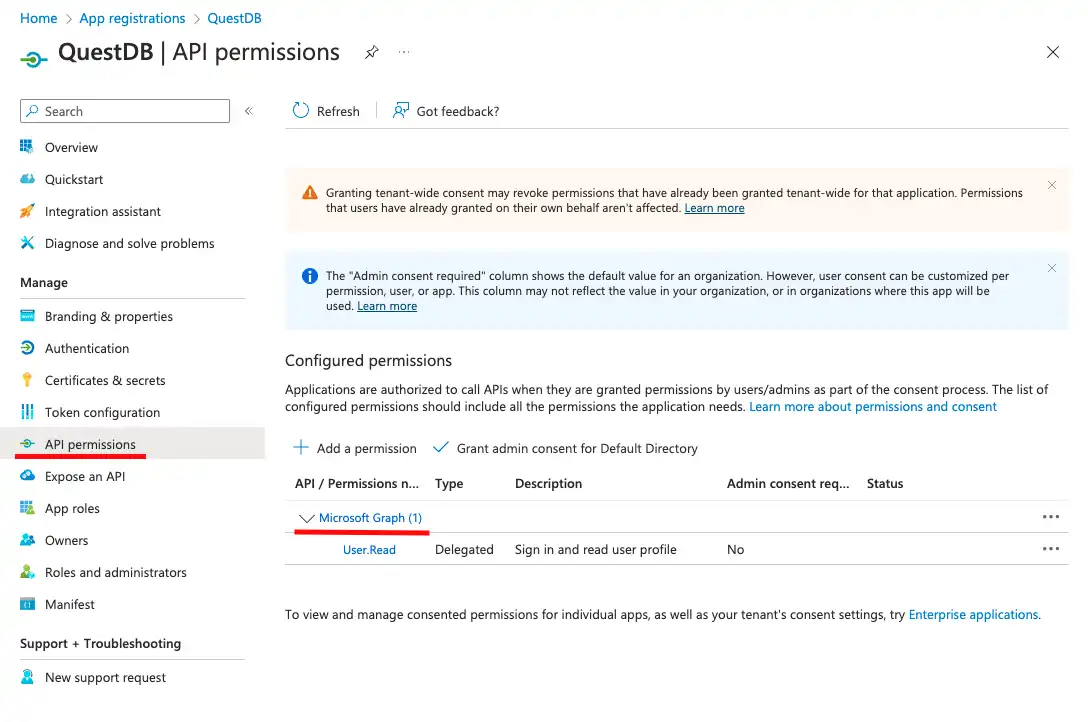
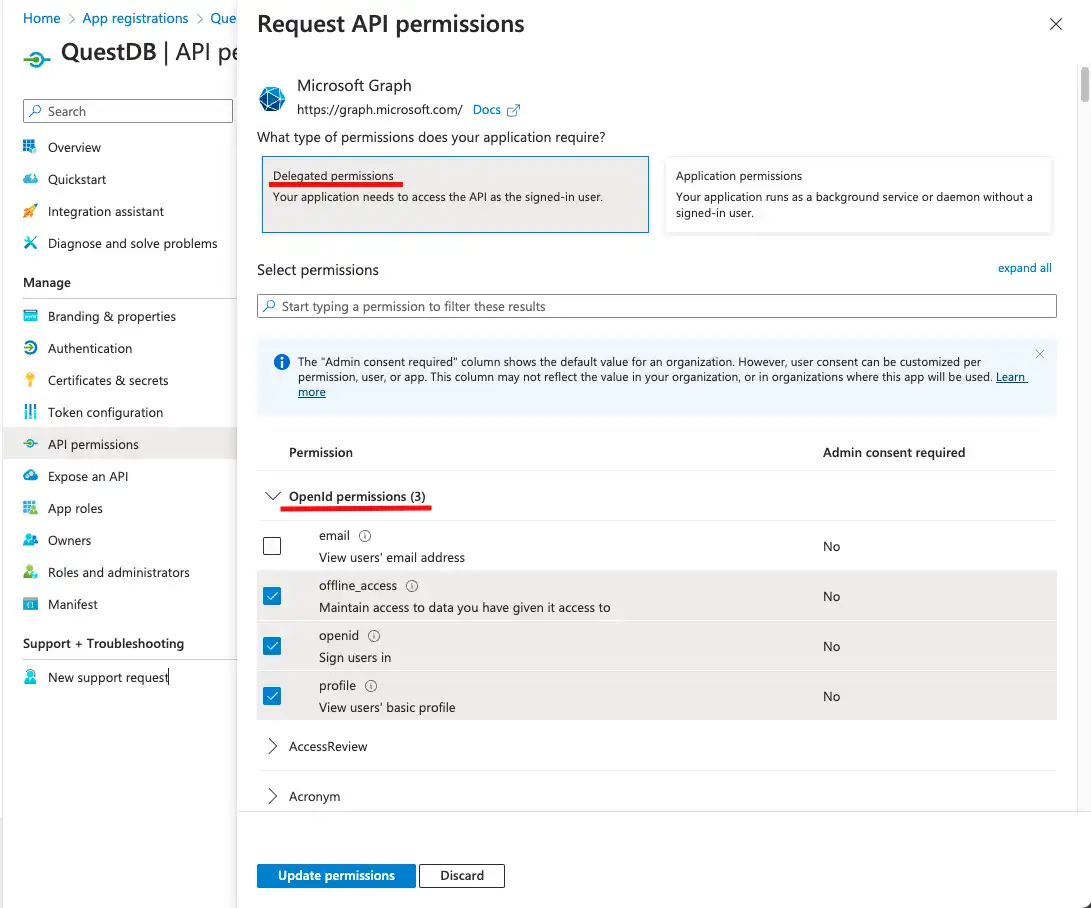
By default, the User.Read permission is added to the list, but what we really need is:
- openid: to be able to issue ID tokens
- profile: to access user information
- offline_access: to be able to issue refresh tokens
By clicking on Microsoft Graph we can select and add these permissions.
The User.Read permission is not needed. It can be removed by clicking
on the ... at the end of the row, and selecting Remove permission from
the popup menu.
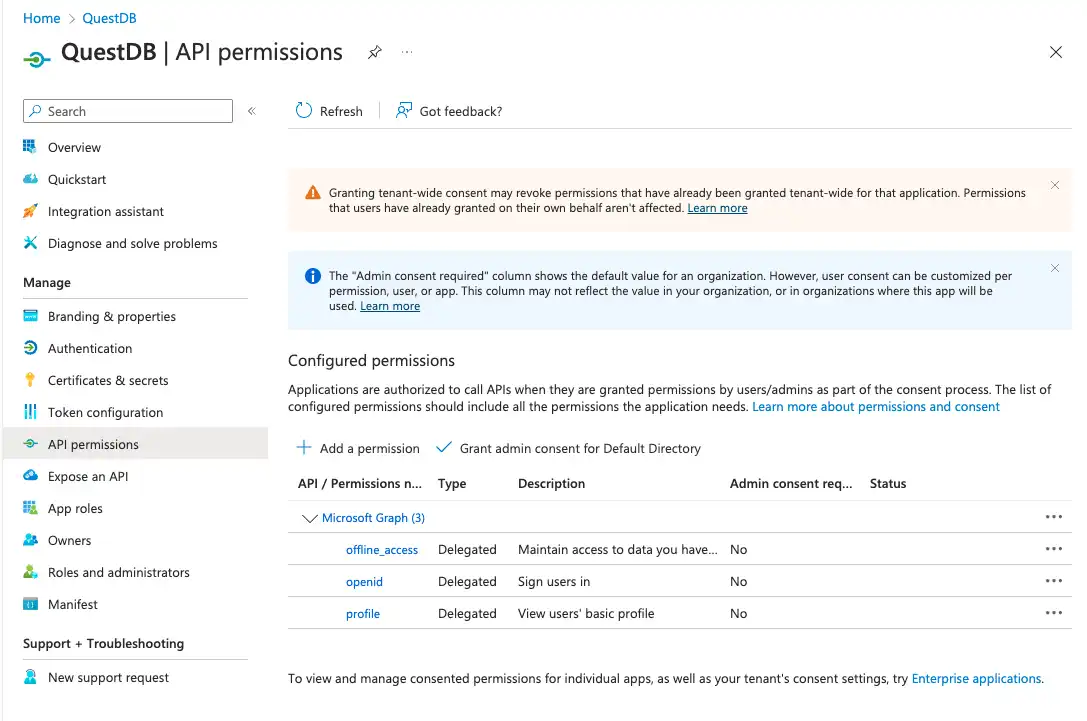
With this we have finished setting up the QuestDB client application in Entra ID, and now we can wire QuestDB and Entra ID together by adding OIDC configuration to QuestDB.
QuestDB configuration
The below should be set in QuestDB's server.conf:
# enable OIDC
acl.oidc.enabled=true

# the claim contains the user's unique username
acl.oidc.sub.claim=preferred_username

# the claim contains the user's group memberships
acl.oidc.groups.claim=groups

# groups are encoded in the token
acl.oidc.groups.encoded.in.token=true

# OIDC configuration endpoint of Entra ID
acl.oidc.configuration.url=https://login.microsoftonline.com/12345678-1234-1234-1234-123456789abc/v2.0/.well-known/openid-configuration

# application ID taken from Entra ID
acl.oidc.client.id=8de84b90-1ea5-4e41-9e84-dba860aa01a6

# redirect URI, QuestDB's HTTP endpoint
acl.oidc.redirect.uri=http://localhost:9000

# OAuth scopes the user has to consent to
acl.oidc.scope=openid profile offline_access

# enable ROPC flow
# optional, required only if ROPC is enabled in Entra ID
acl.oidc.ropc.flow.enabled=true
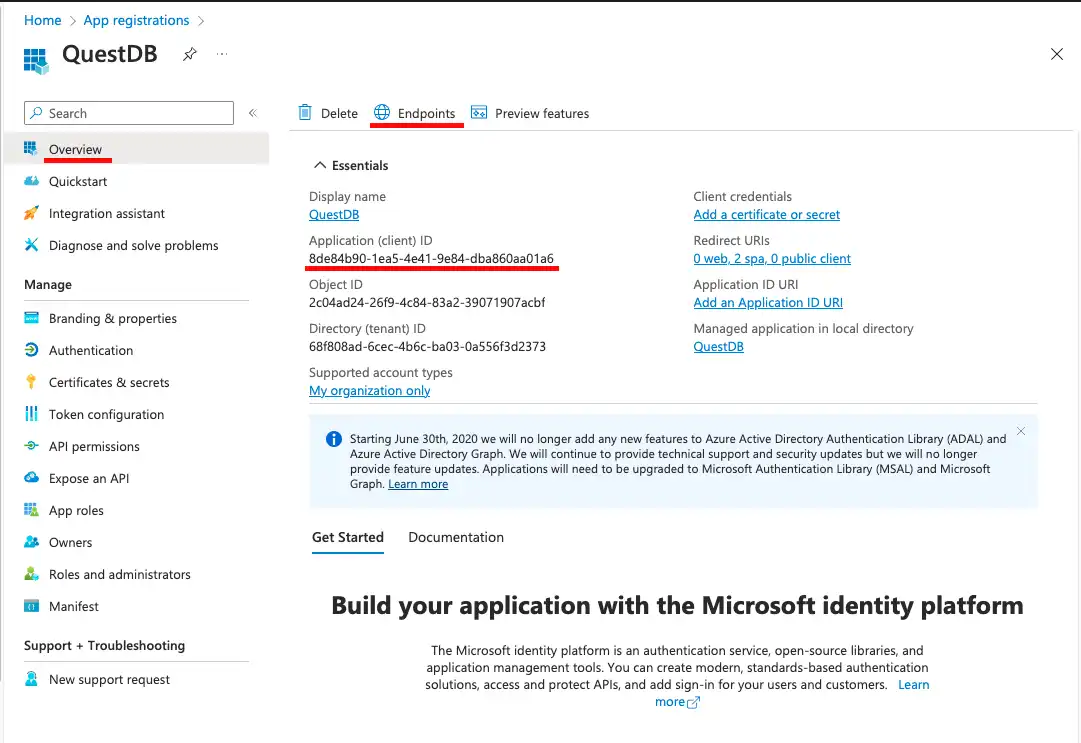
The application ID and the OIDC configuration endpoint's URL can be found in the Overview of the application in Entra ID.
The application ID is displayed right under the application's name, the OIDC configuration endpoint is displayed on the panel which opens up when the Endpoints button is clicked.
Map groups and grant permissions
Now we can start QuestDB, and login with the built-in admin to create group mappings.
As mentioned earlier, authorization works by mapping Entra ID groups to QuestDB groups. When the user logs in, QuestDB decodes Entra ID group memberships from the token, then finds the QuestDB groups mapped to them, and the user gets the permissions based on the mapped groups.
CREATE GROUP extUsers WITH EXTERNAL ALIAS '87654321-1234-1234-1234-123456789abc';
The above command maps the Entra ID group identified by object
id 87654321-1234-1234-1234-123456789abc to a QuestDB group called extUsers.
We should grant the necessary QuestDB endpoint permissions first to make sure users can access the Web Console, Postgres and ILP interfaces as required. Read more about endpoint permissions.
GRANT HTTP, PGWIRE TO groupName;
Now we can grant the rest of the permissions as required. We can grant access to tables, for example.
GRANT SELECT ON table1, table2 to groupName;
Confirm group mappings and login
To test, head to the Web Console and login.
If all has been wired up well, then login will succeed, and the user will have the access granted to them.
Microsoft Entra ID managed identities and service principals
Services that authenticate as themselves, with a managed identity or a service
principal, receive app-only access tokens from Entra ID. These tokens carry no
name or preferred_username claim. They identify the caller by the object ID
of its service principal in the oid claim, and list the
app roles
assigned to it in the roles claim. They can also carry a groups claim, when
the service principal is a member of a security group and the QuestDB
application emits group claims, as set up under Token configuration in
Set up the client application in Entra ID.
QuestDB treats the service as an external user, not as a QuestDB
service account. Like any
external user, it gets its permissions from the QuestDB groups that its claims
map to, and permissions cannot be granted to it directly. With the
configuration below, these are the groups that its app roles map to. When its
token carries no role but carries a groups claim, QuestDB takes the groups
from groups instead, and the service gets the permissions of its Entra ID
security groups.
Unless Assignment required is enabled for the QuestDB application, Entra ID
issues tokens for the application to any service principal in the tenant, and
the token of a service principal without a role carries no roles claim. To
make an app role the only way for a service to get permissions, do one of the
following:
- Keep managed identities and service principals out of the security groups that are mapped to QuestDB groups.
- Enable Assignment required in the Properties of the QuestDB application, under Enterprise applications. Users then need an assignment too, directly or through a group, to log in to the Web Console.
Accepting app-only tokens requires QuestDB Enterprise 4.0.2 or later. On earlier versions, the configuration below rejects every OIDC login, user logins included.
This setup builds on the Web Console setup above: the application registered in Set up the client application in Entra ID, and the QuestDB configuration.
Configure the application in Entra ID
-
Make sure that the application is single-tenant, as described in Token validation. An app role has the same value in every tenant that uses the application, so with a multitenant registration, another tenant could assign the role to its own service principals, and QuestDB would map their tokens to the same QuestDB groups.
-
Under Expose an API, set the Application ID URI, which defaults to
api://<application ID>. Services request their tokens for the scope<Application ID URI>/.default. A token requested for any other API, such as Microsoft Graph, carries that API inaud, and QuestDB rejects it. -
Make the application issue v2.0 access tokens: in its Manifest, set
api.requestedAccessTokenVersionto2. The legacy manifest format calls this propertyaccessTokenAcceptedVersion. QuestDB accepts a token only when itsaudclaim matchesacl.oidc.audience, which defaults to the application ID. A v2.0 token always carries the application ID there. A v1.0 token, the default for applications that accept organizational accounts only, can carry the Application ID URI instead. Web Console logins are not affected, because the Web Console presents ID tokens. -
Under App roles, define a role for each kind of access, with the Applications member type. The examples below use the value
QuestDB.Ingest. -
Assign a role to each managed identity or service principal that needs access. Assign the role to the identity itself: Entra ID does not add a role assigned to a group to the tokens of the service principals in that group.
- For the service principal of an app registration, open that registration, not the QuestDB one. Under API permissions, select Add a permission, APIs my organization uses, the QuestDB application, and Application permissions. Add the role, and grant admin consent.
- For a managed identity, assign the role through Microsoft Graph, as described in Assign a managed identity to an application role.
Configure QuestDB
Replace the two claim settings of the
QuestDB configuration with fallback lists, and
restart QuestDB. Keep acl.oidc.groups.encoded.in.token=true, so that QuestDB
validates app-only tokens against the signing keys of Entra ID, the same way as
ID tokens:
# user tokens carry preferred_username, app-only tokens carry oid
acl.oidc.sub.claim=preferred_username,oid

# app-only tokens carry roles, user tokens carry groups
acl.oidc.groups.claim=roles,groups
User logins take the principal from preferred_username and the groups from
groups, as before. Their tokens carry no roles claim, as long as the app
roles of the QuestDB application admit applications only. App-only tokens take
the principal from oid and the groups from roles, even when they also carry
a groups claim. QuestDB rejects a token that carries neither a role nor a
group. See How QuestDB picks a claim.
Map app roles to QuestDB groups
Map each app role to a QuestDB group by the role's value, the same way as an
Entra ID group, and grant the group what the service needs. A service that
ingests over HTTP or QWP
needs the HTTP endpoint permission and INSERT on its tables:
CREATE GROUP ingestApps WITH EXTERNAL ALIAS 'QuestDB.Ingest';
GRANT HTTP TO ingestApps;
GRANT INSERT ON fx_trades TO ingestApps;
QuestDB cannot create a table on ingestion for an external user, because it
cannot make an external user the owner of the new table. Create the tables
that the service writes to in advance, with the columns that it sends. An
external user that creates a table with SQL must name one of its groups as the
owner, with OWNED BY.
A service that connects to the PGWire endpoint
also needs the PGWIRE endpoint permission. See
Endpoint permissions for the other
endpoints.
Request a token in the service
The service requests its token for the QuestDB application. With the
Azure Identity library
for Python, DefaultAzureCredential requests the token as the managed identity
of the Azure resource that the service runs on, or as a service principal set
up in environment variables. For a user-assigned managed identity, set the
AZURE_CLIENT_ID environment variable to the client ID of the identity.
Otherwise, the credential uses the system-assigned identity.
The examples use the QWP API of the questdb package, version 5.0 or later.
Install the libraries with python3 -m pip install -U questdb azure-identity:
import questdb
from azure.identity import DefaultAzureCredential
from questdb import TimestampNanos

# Application ID URI of the QuestDB application, followed by /.default
scope = "api://8de84b90-1ea5-4e41-9e84-dba860aa01a6/.default"
credential = DefaultAzureCredential()
token = credential.get_token(scope)

conf = f"wss::addr=questdb.example.com:9000;token={token.token};"
with questdb.connect(conf) as db:
    with db.sender() as sender:
        sender.row(
            "fx_trades",
            symbols={"symbol": "EURUSD", "side": "buy"},
            columns={"price": 1.0842, "quantity": 100000.0},
            at=TimestampNanos.now(),
        )
        sender.flush(wait=True)
flush(wait=True) returns when the server has accepted the rows. Rows that the
server rejects, for example because the group lacks INSERT on the table, go
to the error handler of the connection, which logs them by default. See
Server rejections.
The client presents the same token on every connection that it opens: the
first one, the additional connections of its pool, and the connections that
replace a failed one. An open connection stays open when its token expires, but
QuestDB rejects a new connection that presents an expired token. A long-running
service therefore closes db, the handle that questdb.connect() returns,
before token.expires_on, a Unix timestamp, and connects again with a new
token. The credential caches the token in memory and requests a new one when
the cached token nears expiry, so calling get_token() often is cheap:
import time

import questdb
from azure.identity import DefaultAzureCredential
from questdb import TimestampNanos

SCOPE = "api://8de84b90-1ea5-4e41-9e84-dba860aa01a6/.default"
ADDR = "questdb.example.com:9000"
# connect again when the token expires within this many seconds
REFRESH_MARGIN_SECONDS = 600

credential = DefaultAzureCredential()


def on_rejection(error):
    # rows that the server rejected, for example for a missing grant
    print("rejected:", error.category.tag, error.message)


def connect(token):
    conf = f"wss::addr={ADDR};token={token.token};"
    return questdb.connect(conf, error_handler=on_rejection)


def next_trades():
    # replace with your source of trades
    time.sleep(1)
    return [("EURUSD", "buy", 1.0842, 100000.0)]


token = credential.get_token(SCOPE)
db = connect(token)
try:
    while True:
        trades = next_trades()
        if time.time() > token.expires_on - REFRESH_MARGIN_SECONDS:
            new_token = credential.get_token(SCOPE)
            # the credential returns the cached token until it renews it
            if new_token.token != token.token:
                db.close()
                token = new_token
                db = connect(token)
        with db.sender() as sender:
            for symbol, side, price, quantity in trades:
                sender.row(
                    "fx_trades",
                    symbols={"symbol": symbol, "side": side},
                    columns={"price": price, "quantity": quantity},
                    at=TimestampNanos.now(),
                )
            sender.flush(wait=True)
finally:
    db.close()
See Authentication and TLS
for the client options. For the PGWire endpoint,
enable acl.oidc.pg.token.as.password.enabled, and send the token as the
password of the _sso user.
Verify the setup
current_user() returns the principal that QuestDB sees for the service: the
object ID of its service principal, from the oid claim. Run it from the
service while it is connected, with pandas installed for to_pandas():
with db.query("SELECT current_user()") as result:
    print(result.to_pandas())
If the service cannot connect, the server log gives the reason, as described in Rejected logins. For a token that carries neither a role nor a group, the log lists the claims that the token carries.
Change or revoke access
QuestDB reads the roles from the token, so a change to the roles of a service takes effect when the service presents a new token. Azure caches managed identity tokens for around 24 hours, so a role assigned to, or removed from, a managed identity can take hours to reach QuestDB. See the managed identity best practices. To cut a service off without waiting for its token to expire, revoke the permissions of its QuestDB group.